
In the articles on CAD and Blender, I have demonstrated how to make a printable boomerang model. In this article, I will discuss some of the issues to deal with when actually 3d printing those boomerangs.
This is not an article on 3d printing as such – there is lots and lots of that available elsewhere.
Introduction
For quite some time – 8 years, actually – I relied on commercial printing services to print my boomerang designs. Printers were either very expensive, or demanded a considerable amount of DIY and tinkering. But most importantly, printing with ABS plastic in my living room was a no-go due to its harmful emissions.
Since then, very affordable printers – mostly by Chinese companies such as Creality, AnyCubic, Wanhao and others – have dominated the home market, and more environmentally friendly materials such as PLA have become available.
Which Printing Process to Use
For a long time, only Fused Deposition Modeling (FDM) printers were available to the home gamer, so that's what we will consider in the remainder of this article. Recently, resin-based SLA (stereolithography) printers have dropped in price, but the hobby-budget versions have very small build volumes, so we will not consider those here.
Using Commercial Printing services
Commercial printing services allow you to upload your 3d object, specify the material, color, and other printing parameters, and have the printed object shipped back to you. I've made a bunch of boomerangs this way, and most of them worked as intended.
The advantages of using professional services are obvious:
- These people know what they are doing, so you can expect to get good print quality.
- You don't have the hassle, noise, and emissions of the printer in your home.
- You don't need to invest in a printer yourself.
There are several disadvantages, though:
- The turnaround times are a bit of a buzzkill: you design something, wait a couple of days, make adjustments, wait another week, etc.
- The costs quickly add up; the cheapest service I know charges me about 15 Euros plus shipping for a small two blader, and I still have to do the prep work – slicing with HP's software – myself. Other, more comfortable services will be more like 25 Euros. So after about 10 boomerangs, an entry-level printer would be amortized.
- Most commercial services offer rather limited build volumes, usually something like 200 mm × 200 mm. While this is sufficient for a working boomerang, current affordable CR-10 class printers can do 300 mm × 300 mm which lets you print objects the size of standard two and three bladed sports boomerangs.
- You can't do fancy stunts such as installing weights in hidden pockets by pausing the printer mid-print.
Choosing a Printer
Actually, 3d printed boomerangs can be made quite small and will still work. I have successfully printed a two blader with 150 mm wing span which flies fine. A boomerang like that would fit onto the build plate of pretty much any available printer. These mini boomerangs are harder to handle, though, than their larger counterparts, so I suggest going a little bigger if you can.
Thus, I would recommend at least a printer of the 200 mm × 200 mm class. Examples include the Ender 3, the AnyCubic i3 Mega, or the Tevo Tarantula. Some of these can be had for less than 200 Euros, so I don't see much reason to go any smaller.
A quadratic build plate is recommended – some printers such as the old MakerBots use strange form factors like 250 mm × 150 mm, which makes it hard to actually fit a boomerang on there.
If you have the space and are willing to spend a little more, I recommend getting a printer of the CR-10 class. These have a 300 mm × 300 mm build envelope, which lets you print pretty much any boomerang design that can realistically be made using an FDM printer. Going larger will need endless printing times, and warping and stability issues may arise.
Recommended printers of that class include all members of the CR-10 family and their clones such as the Evnovo Sidewinder X1, the Wanhao D9, or the Tevo Tornado.
While I find delta style printers appealing, they usually have a rather small, round, but tall build volume, which does not fit the requirements of our large, flat objects very well.
Choosing a Nozzle
Most FDM printers come with a .4 mm nozzle. Since boomerangs will not require fine details, and are prone to stair-stepping on their shallow slopes anyway, I find a .6 mm nozzle is a better fit since it outputs about twice as much plastic per second compared to a .4 mm one.
Going even larger, e.g., to .8 mm might work, but you might have to use something like a Volcano hot-end which can melt large volumes of plastic quickly. I don't think a stock hot-end would work well at those nozzle sizes.
Print Settings
Print Quality
You can print surprisingly ugly boomerangs which will fly just as well as the pretty ones, so setting the print speed and layer height is pretty much an aesthetic decision.
I usually print with .2 mm layer height and 60 mm/s print speed, but when prototyping, I use .32 mm and the boomerangs work just fine. You will see some amount of stair-stepping on the trailing edges anyway due to their gentle slope.
Going as low as .12 mm looks better, of course, but I haven't found any advantages over .2 mm yet regarding stability or performance.
Walls and Infill
Our boomerangs need to be able to take a beating, so we cannot skimp on the wall thickness. I usually print about .8 mm of solid top and bottom layers (3-4 layers at .2 layer height), and 1.5 mm to 2 mm of perimeters (about 4 perimeters at .4 mm line width).
This doesn't leave all that much room for infill. I usually use something like 30 percent infill with a grid pattern, since that prints reasonably quickly.
I have tried going much denser on the infill, but I ran into issues with new layers softening the ones below, so my print turned into a giant mess.
Build Plate Adhesion
For a flat object like a boomerang to print well, you need to get your bed leveled properly. If needed, use some sort of adhesive to increase bed adhesion. I've used PrintaFix successfully, although I can usually do without.
I try to avoid printing with brims, since these are a pain to remove and leave ugly edges on printed boomerangs. Rafts could be used, but on a large flat shape like a boomerang they should not be necessary, and they will waste considerable amounts of filament and time.
Lifting and warping can be an issue, but I found that with proper bed leveling and a build plate that adheres well – I use PEI or BuiltTak-like polycarbonate build surfaces – it is manageable.
A flexible, magnetic build plate ("flex plate") is highly recommended, since getting a large flat object such as a boomerang off of the build plate if it adheres well can be all but impossible, at least without damaging it. With a flex plate, I can just pop off the finished boomerang every time. I use the WhamBam build plate which works great, but is rather expensive due to its special temperature-resistant magnetic base. Since I only print PLA, a less expensive product such as the one by PrimaCreator works just as well.
Postprocessing
Smoothing
I don't do much in terms of surface quality, I just leave the boomerang as-is. One thing I might do is break the sharp bottom edges of the printed boomerang. A machinist's deburring tool works great for that, but a file or sandpaper can also be used.
Flatness
Boomerangs are very sensitive regarding flatness. If the wings are bent upwards or downwards (called "dihedral" or "anhedral"), the flight behavior will change drastically. To test the boomerang for flatness, place it onto a flat surface such as a kitchen countertop and tap it in various places. If you hear a slight clicking sound, that spot is high.
I found that most of my boomerangs, coming off the build plate, have a tendency to bend their wings downwards a little (anhedral). This needs to be corrected. Usually, a slight dihedral is preferable over anhedral.
Since we're printing with a thermoplastic, the fix is easy: just heat up your boomerang and bend the wings into shape. It's easy to overdo this, though. The method I recommend is warming up the boomerang slightly with a hairdryer or a hot-air gun – even holding it over a toaster will work. Do this carefully, since the material will go soft quite quickly. Then place the boomerang onto a flat surface with washers or coins supporting the spots that we want to raise, e.g. the wingtips, and weigh down the rest of the boomerang.
Adding Weights
Small weights can increase the wind stability and range of your boomerang. The easiest way to play with this is to just tape on small coins or washers.
A more elegant solution though is to embed the weights into the boomerang. Since we usually have at least a partly hollow object, we cannot just drill holes and expect the weights to stick in there, though. So you need to construct pockets for your weights into the boomerang beforehand, and then glue in your weight using two-part epoxy. CA glue ("superglue") can be used, but make sure to slightly moisten your boomerang before gluing as freshly printed PLA will not stick since it is too dry – superglue needs moisture to harden.
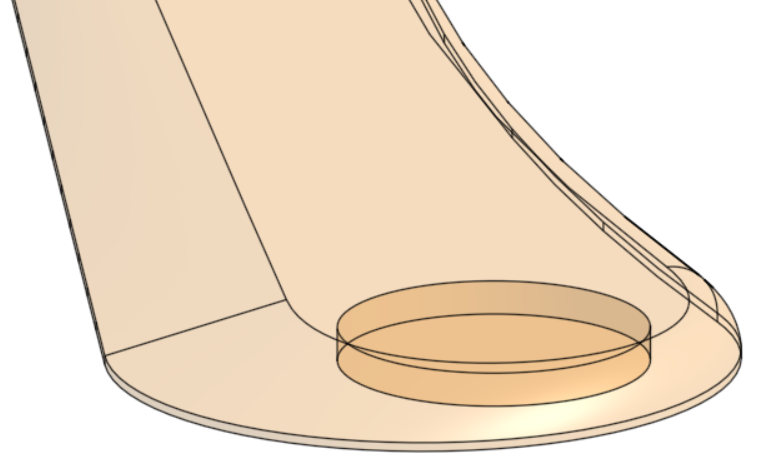
The most interesting way of installing weights into a boomerang is to construct hidden pockets – just cut a coin-sized cylinder out of the middle of your boomerang, as shown in this picture:
The challenge that remains is to figure out in your slicer at which height the pocket ends, and how to pause and resume the print at that layer. I use Cura, and there I can use the "Modify G-Code → Pause at Height" feature, which basically translates to an M226 inserted at the proper layer.
When the printer pauses, just insert or superglue some coins into the pockets. Make sure the top sides of the coins are flush with or below the current layer, so that you don't damage your nozzle. You want to make the pockets sufficiently large so the coins will fit in easily, but not so large that the coins rattle around.