Introduction

Ever since I first saw the beautiful lap joint boomerangs made by Pat Steigman, Dave Hendricks, Steven Graham, and Dr. Fred Malmberg, I wanted to make some of my own. There was even a great tutorial on making lap joint boomerangs on the web.
Unfortunately, at that time I did not know anything about woodworking except making boomerangs from sheet goods. Since then, I've figured out how to make lap joint boomerangs using a reasonably small set of hand tools; thus, I want to share the following description as a complement to the abovementioned tutorial.
Choosing Hand Tools
One problem an aspiring hand tool user is faced with is which tools to buy.
If you ask around in woodworking forums, the answer usually is: "Buy the best tools you can afford." Not everybody will be willing to spend 400 Euros on a high-end handplane or a handmade saw, though.
I agree that many of the hand tools on the market, particularly those in the big box stores, are junk. But I still think that going for "the best tool I can afford" is unrealistic. Someone who wants to start woodworking may actually be able to afford a 400 Euro Lie Nielsen plane or a 200 Euro Starrett combination square (I'm not making this up), but few beginners will be willing to invest these sums for their first tools.
In the following, I will show some of the hand tools that have worked well for me and that are, on average, one-tenth of the price of the aforementioned high-end options. Unfortunately, availability of these tools is a little hit-and-miss, so please bear with me if some of the following links are no longer valid.
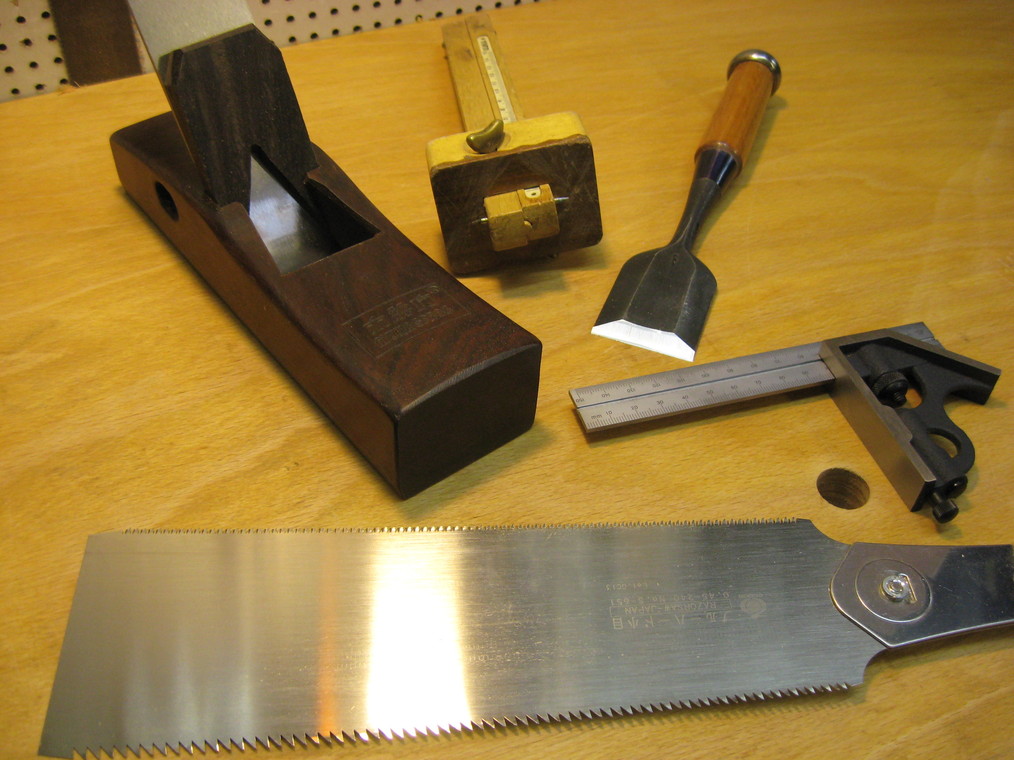 These are the tools I would consider the bare minimum if you want
to make hardwood lap joints with hand tools. Starting clockwise
from the top left, we have:
These are the tools I would consider the bare minimum if you want
to make hardwood lap joints with hand tools. Starting clockwise
from the top left, we have:
-
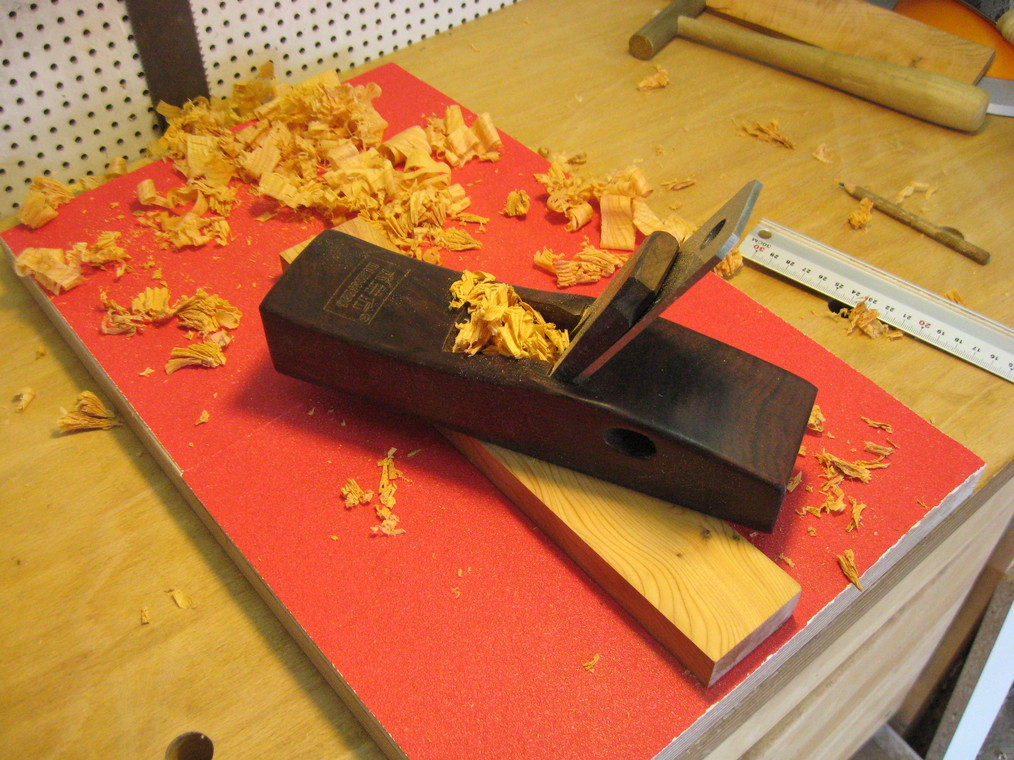
A hand plane. This is the excellent high-angle smoother from Mujingfang. In my, albeit limited, experience, this plane is the best value for the money to be had on the plane market. I paid about 44 € for it, and it is well-known for its good overall finish and very durable HSS blade. But any other handplane will work, even a block plane would be sufficient as long as it is sharp.
-
A marking gauge. This is an old Ulmia marking gauge I got from the flea market for a couple of Euros. A nicer marking gauge such as the Veritas with its cutting wheel and micro adjustment is not strictly necessary, but is well worth the investment.
-
A chisel. This is a 42 mm (1 5/8") Japanese chisel from a discontinued line that Dictum once sold. If I recall correctly, it was somewhat less than 30 €. While that may seem expensive, western style chisels this wide (e. g. Two Cherries) are just as costly; plus, the Japanese ones are quite easy to sharpen freehand.
-
A combination square. This square used to sell for around 20 € at Dictum. I like it very much because of its size - just right for this size of project - and because of its flexibility. It is not available anymore, though. I would now recommend this square from Axminster.
-
A Japanese ryoba saw. This Gyokucho Ryoba Komane 240 is a very good all-purpose saw; its two-sided blade allows for both rip and cross cuts. It's about 32 €.
As it happens, I bought all of these tools (except the marking gauge) from Dictum, although other vendors such as Fine Tools or Magma have similar offers.
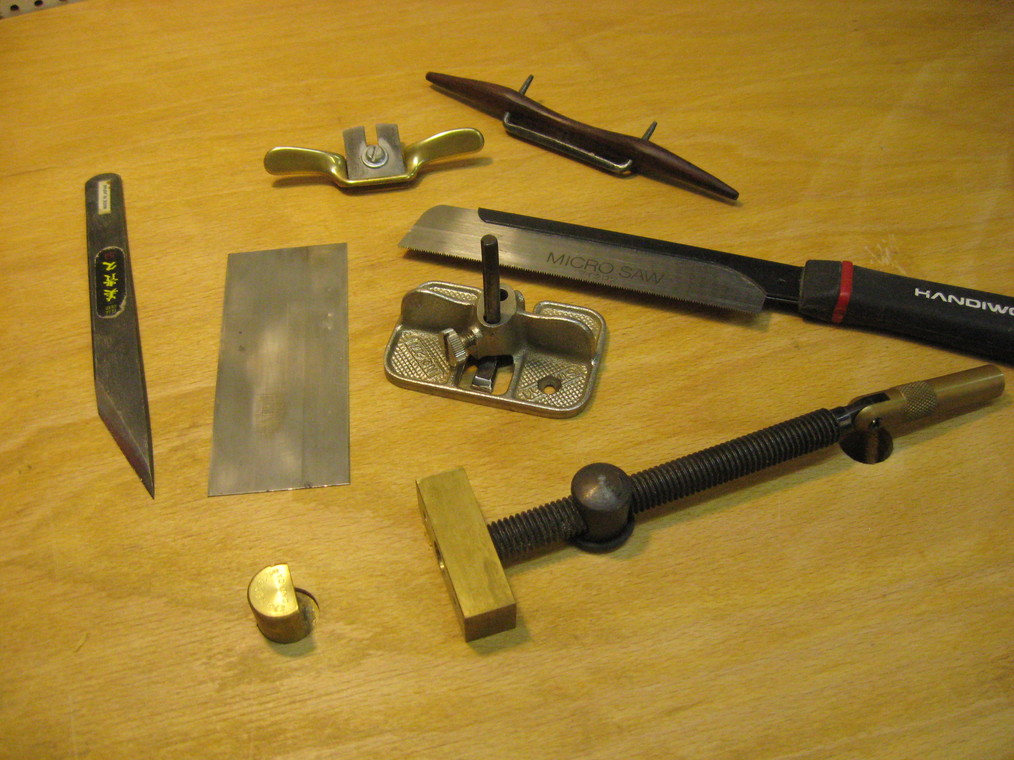
These are some tools that, while not strictly necessary, I consider very useful for making lapjoint boomerangs. More or less from top to bottom, these are:
-
Small spokeshaves. These are a really quick way to shape the airfoil of a hardwood boomerang. Unfortunately, standard spokeshaves modeled after the Stanley 151 are way too large for our purposes. Shown here are a small bronze spokeshave made by a company called "Aldon Products" and sold by Lee Valley Tools and Amazon (about $25 for a pack of three (!)). The Mujingfang spokeshave shown on the right has more than doubled in price recently. I would no longer recommend it.
-
A small Japanese backsaw. This small, but very useful saw is sold by Dictum for about 18 €. I normally use it to cut the shoulder of the lap joint.
-
A card scraper. This is a rather thin card scraper (0.4 or 0.5 mm, I guess), which is suitable for fine work. I don't remember where I got it from; it might even be a reclaimed piece of a worn-out Japanese saw blade. - A Japanese [carving knife]{style="font-weight: bo ld;"}. These knives are very inexpensive and razor sharp. I got this one for around 12 € from Dictum.
-
A Stanley 271 router plane I got via Ebay. I haven't used this plane on a boomerang project yet. It turns out, though, that what you want to use is a full-sized Stanley 71 or similar – the 271 is just too small.
-
Some clamping devices, namely, the Veritas Bench Pup and a Wonder Pup. I got these (a pair of bench pups and one wonder pup) for about 45 € from Fine Tools. These things are incredibly useful. Just drill some 3/4" holes into a scrap piece of multi-ply birch or beech, and you've got a workbench.
 As lap joint boomerangs consist mainly of two thin strips of hardwood, I need a way of fixing those small pieces
to the bench while planing. Unfortunately, clamping does not really work because all clamping mechanisms I know
are way too bulky to get out of the way on such small-scale work.
As lap joint boomerangs consist mainly of two thin strips of hardwood, I need a way of fixing those small pieces
to the bench while planing. Unfortunately, clamping does not really work because all clamping mechanisms I know
are way too bulky to get out of the way on such small-scale work.
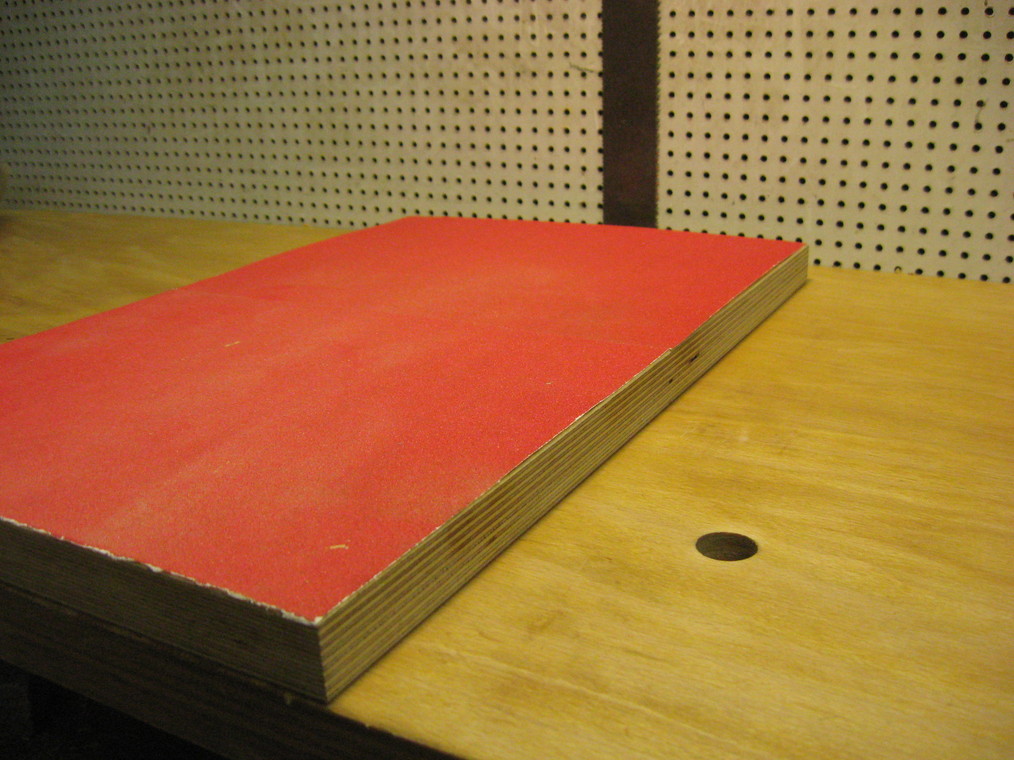
The solution I use is a simple piece of multi-ply birch scrap that can be fixed to the bench on one side, and has some sand paper spray-glued to the other side. The sandpaper produces enough friction to keep the wood in place while planing. Another option is to do away with the planing aid and just butt your stock against a bench dog.
 On the bottom of the planing aid, I have drilled two holes that slide
over two bench pups. This way, I can quickly pop the planing board in place without fiddling around with clamps.
Furthermore, no clamp gets in the way of the plane.
On the bottom of the planing aid, I have drilled two holes that slide
over two bench pups. This way, I can quickly pop the planing board in place without fiddling around with clamps.
Furthermore, no clamp gets in the way of the plane.
Sharpening
Anyone who wants to use edge tools such as chisels or hand planes needs to know how to sharpen them. While sharpening as such would go beyond the scope of this article, I'd like to point out two alternatives to get started. One method that can be done with household items is the Scary Sharp system, which uses sandpaper on a flat surface (such as a sheet of glass) as an abrasive to sharpen and hone cutting edges.
While Scary Sharp worked well for me at the beginning, I now prefer to use Japanese waterstones. An inexpensive combination stone for sharpening and honing can be obtained for as little as 17 €. I recommend getting separate stones, though. Currently I mainly use an 800 grit King for sharpening and a 10000 grit Naniwa for honing.
For sharpening western style chisels and plane irons, I recommend getting a honing guide. Japanese chisels are rather easy to hone freehand due to their wide bevel and hollowed back.
Hand Tools and Work Safety
Working with hand tools is much less dangerous than using power tools. Still, you can hurt yourself with a sharp knife or chisel, so you need to keep your wits about you. Never work any edge tool towards any part of your body; always think about where the tool would end if it slipped.
When working close to your eyes, wear some sort of eye protection. I wear safety glasses when I fret-saw the shape of the boomerang, because I tend to break fret saw blades and there might be pieces of blade flying around. If what you're doing involves dust or toxic fumes, wear appropriate breathing protection. I use a dust mask, for example, when I am hand sanding.
Creating the Boomerang Blank
Obtaining Suitable Wood
You cannot buy wood that is dimensioned for making lap joint boomerangs, at least not where I live. So the first problem when starting out to make hardwood boomerangs was to obtain suitable wood.
Here are some ideas for getting your hands on that small piece of hardwood. For our purposes, we need two strips of about 300x50x8 mm (12" x 2" x 5/8").
- Ebay Lots of people are selling small pieces there, e. g., scraps, tonewood, or turning blanks.
- Turning blanks. There are specialized dealers that sell small quantities of beautiful hardwoods to wood turners. This is my main source of wood for making boomerangs. Those pieces will need to be resawn and planed to a suitable thickness. Dealers in Germany that I have bought from include Drechselmaus, Hobbyholz and Cropp Timber.
- Scraps and reclaimed wood. There are many opportunities for picking up scraps: I've cut up old furniture that was given to me or that I found on the curb. I've also used remains of oaken wine casks that were found near a vinyard.
- Tonewood. Some pieces intended for musical instruments make good boomerang stock. I have used tonewood intended for violin necks, as well as rosewood sold as guitar fretboards.
Resawing the Wing Blanks
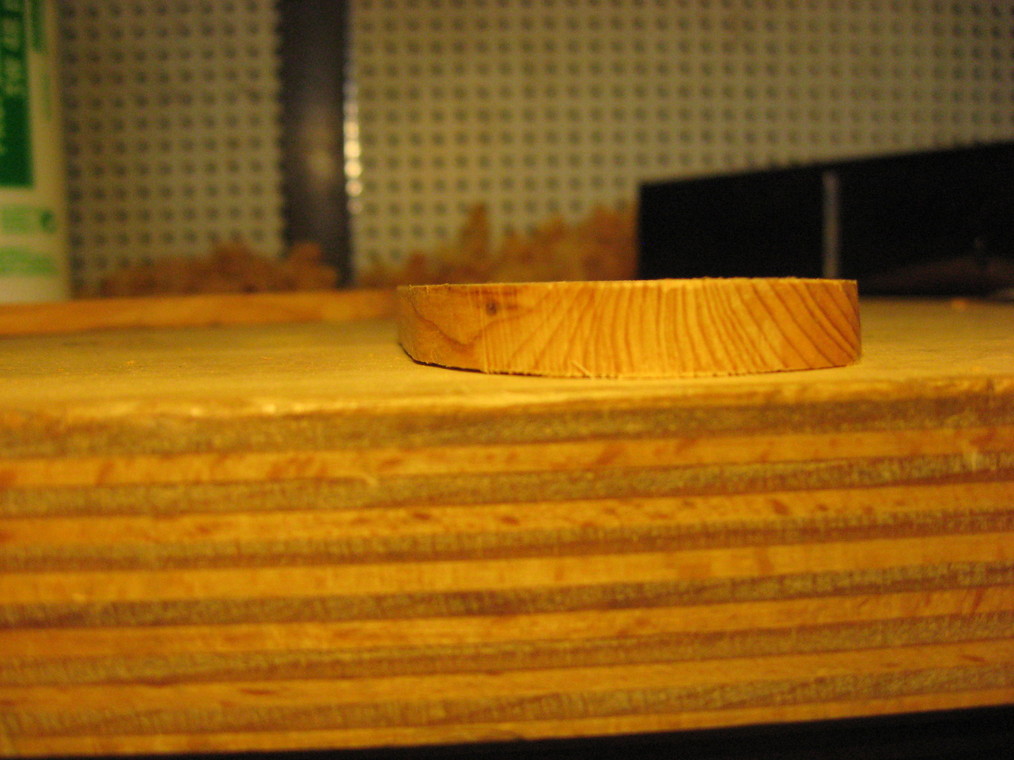
 For this boomerang, I start with a block of yew that once was a turning blank.
Note that the wood is oriented such that the growth rings are as vertical as possible. This is the most dimensionally
stable orientation for the wings.
For this boomerang, I start with a block of yew that once was a turning blank.
Note that the wood is oriented such that the growth rings are as vertical as possible. This is the most dimensionally
stable orientation for the wings.
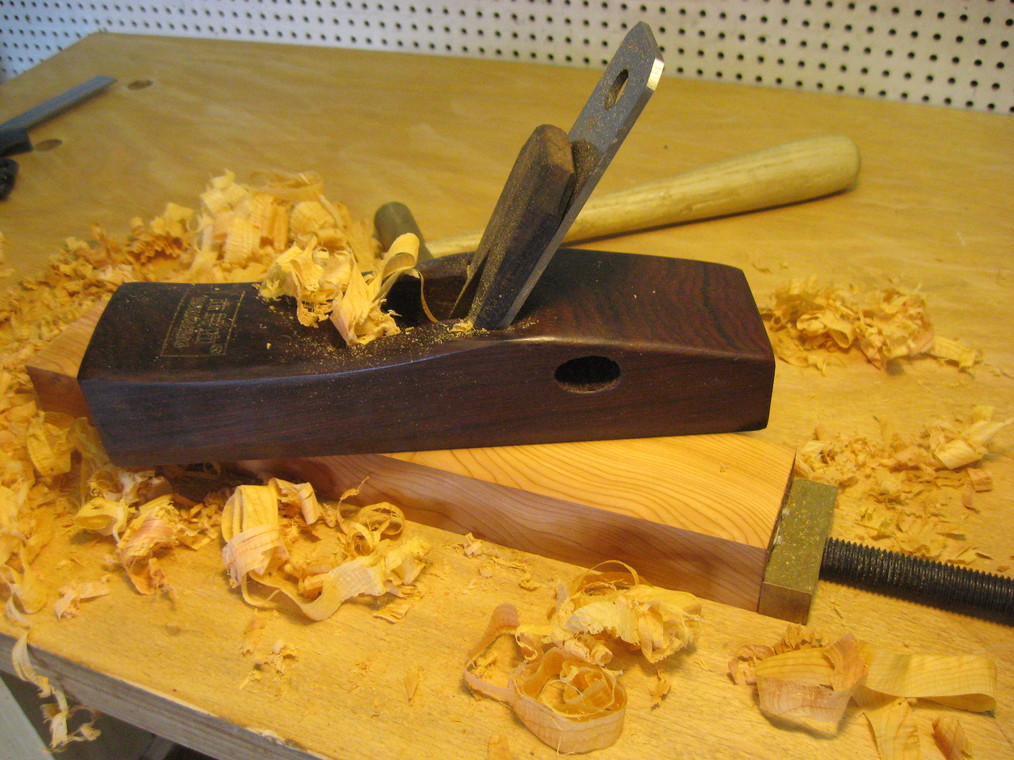 First, I plane one face to make
it perfectly flat. As long as the block of wood is thick enough, I don't bother with the planing board; I just
clamp it to the bench top with the Wonder Pup. I check for flatness using a ruler, but also try the piece on a flat surface to see if it's rocking. You won't detect
a slight twist in your piece with just a ruler.
First, I plane one face to make
it perfectly flat. As long as the block of wood is thick enough, I don't bother with the planing board; I just
clamp it to the bench top with the Wonder Pup. I check for flatness using a ruler, but also try the piece on a flat surface to see if it's rocking. You won't detect
a slight twist in your piece with just a ruler.
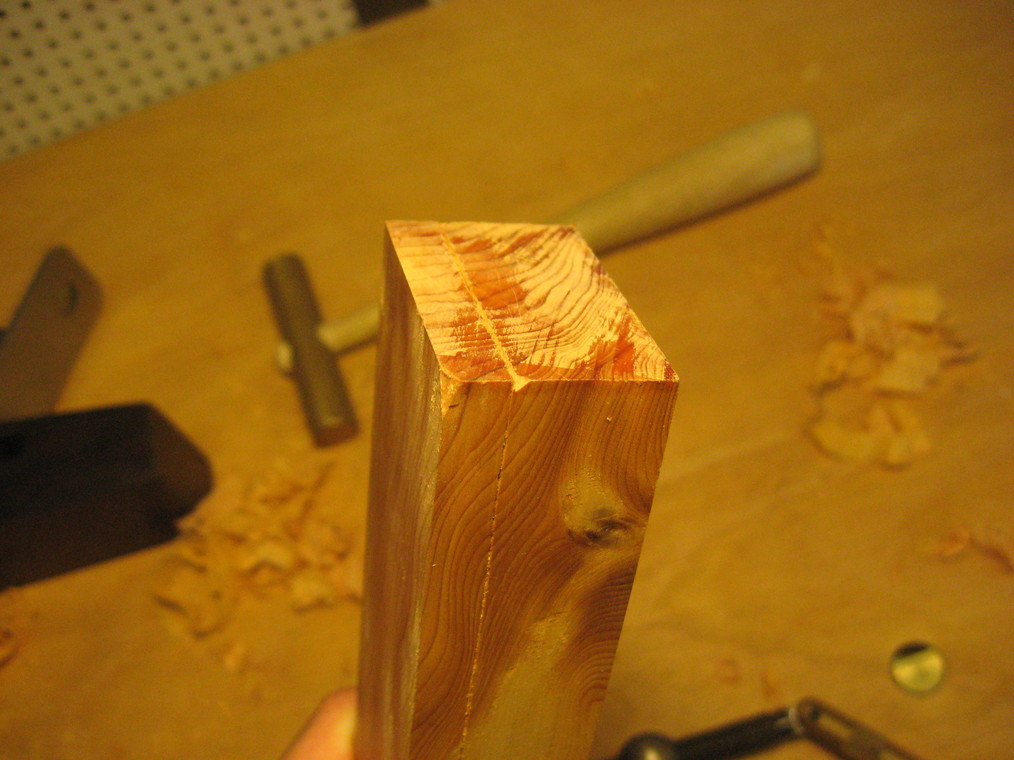
 I mark the freshly planed reference
face so that I know where I work from.
I mark the freshly planed reference
face so that I know where I work from.
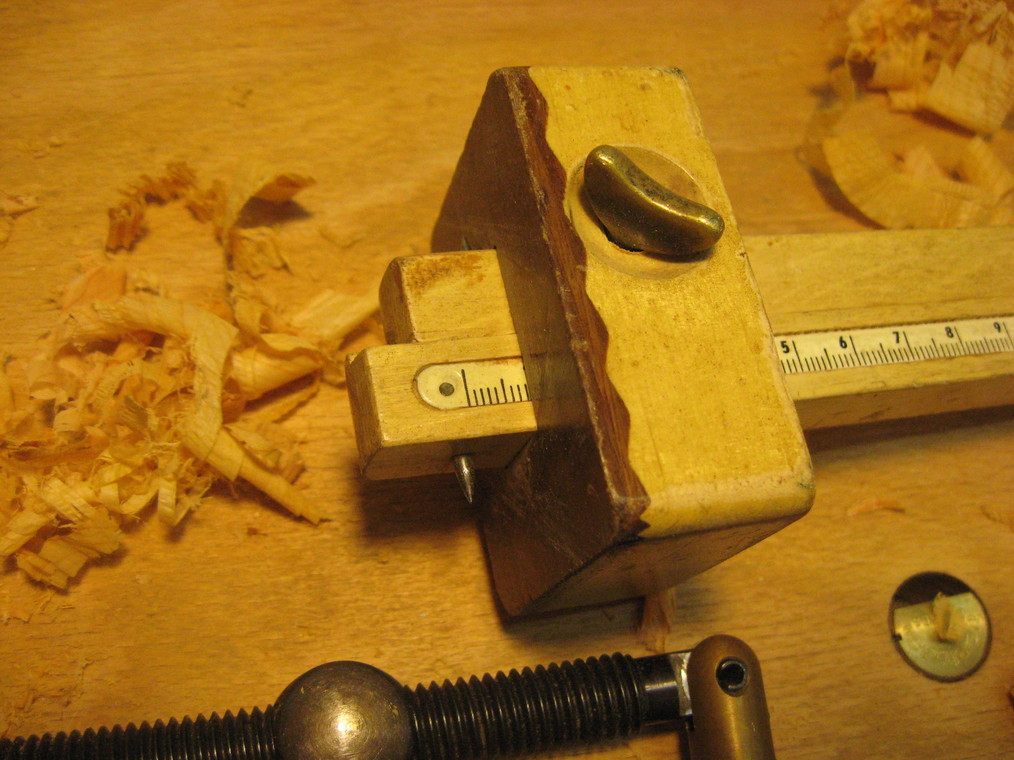 While I aim for a final thickness of about 6 mm (1/4"), I need some room for inaccuracies during sawing, so I set
the marking gauge to 8 mm (5/16").
While I aim for a final thickness of about 6 mm (1/4"), I need some room for inaccuracies during sawing, so I set
the marking gauge to 8 mm (5/16").
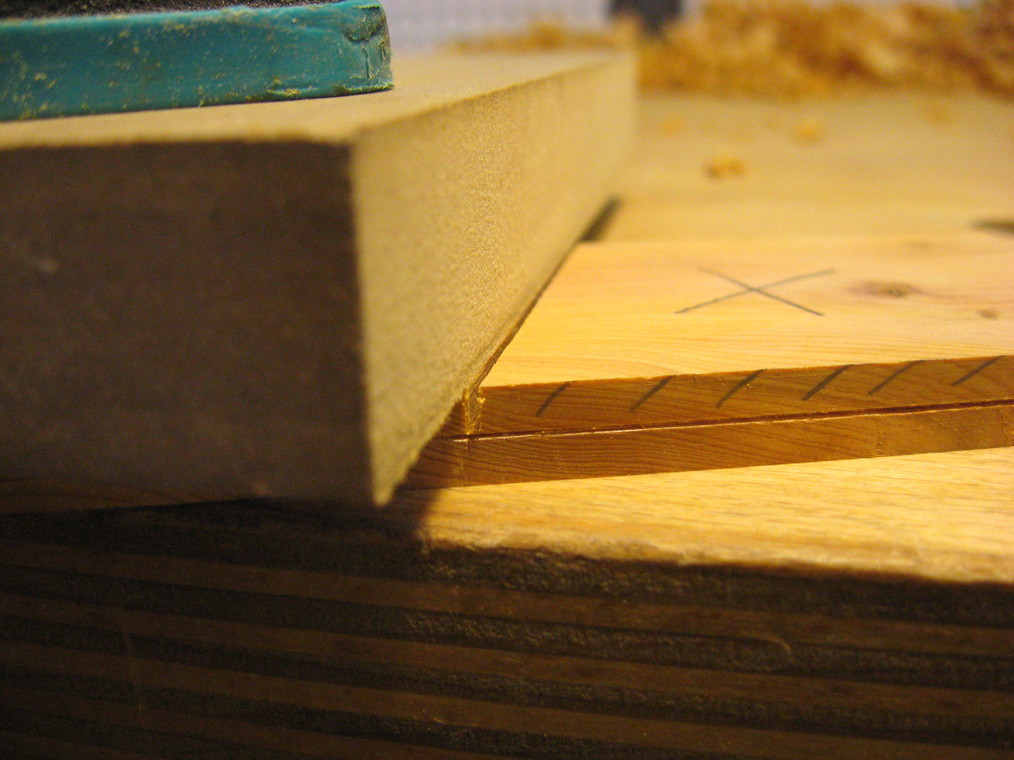
 Using the marking gauge, I scribe a line 8 mm from the flat face. The little notch in the corner is used to start
the saw.
Using the marking gauge, I scribe a line 8 mm from the flat face. The little notch in the corner is used to start
the saw.
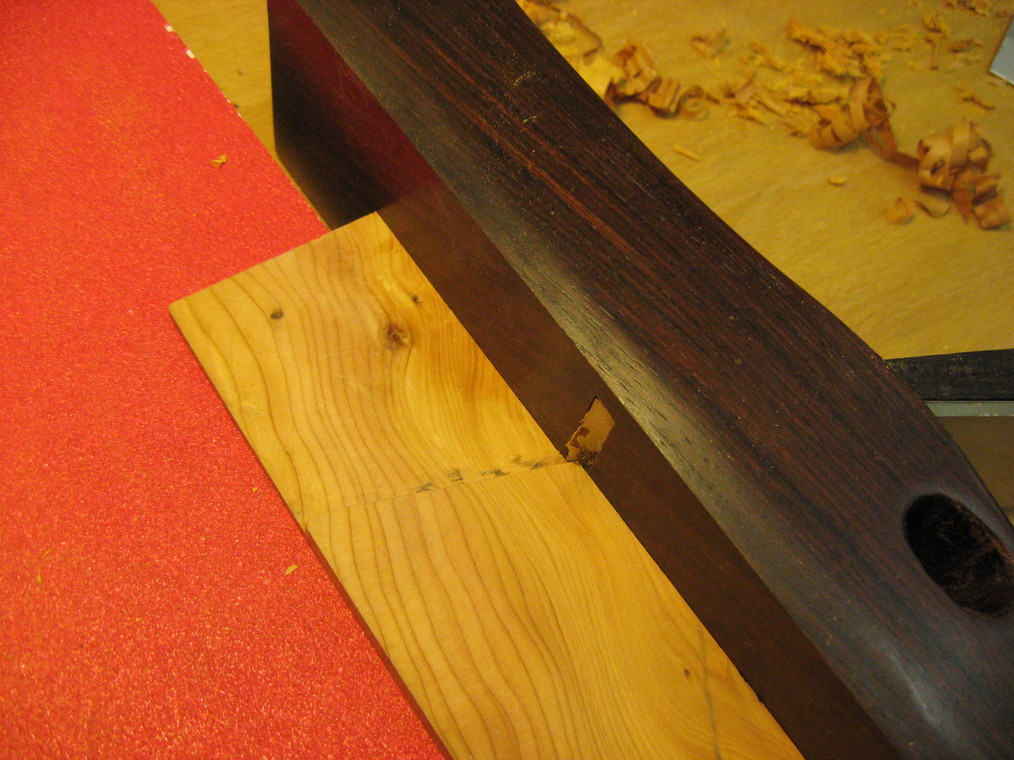
 Now this is the tricky part. I saw down the scribed line, taking care to stay on the waste side. When the cut gets deep enough, I use a small wedge in the kerf so the saw won't bind.
You might want to practice this cut on some scrap.
Now this is the tricky part. I saw down the scribed line, taking care to stay on the waste side. When the cut gets deep enough, I use a small wedge in the kerf so the saw won't bind.
You might want to practice this cut on some scrap.
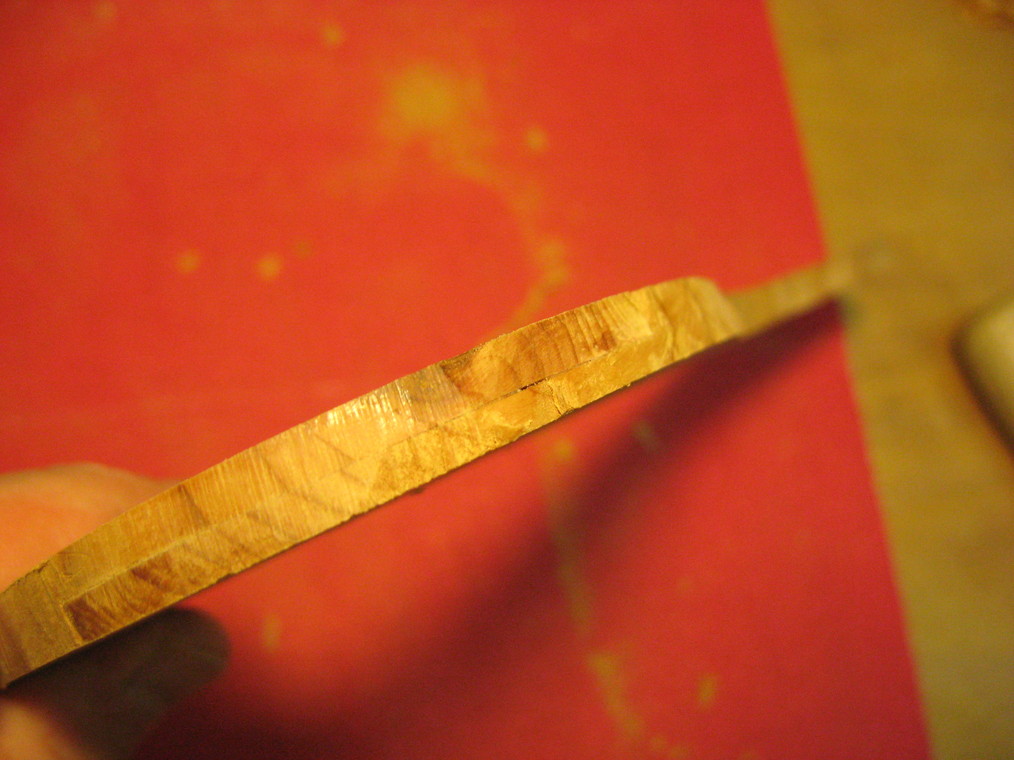
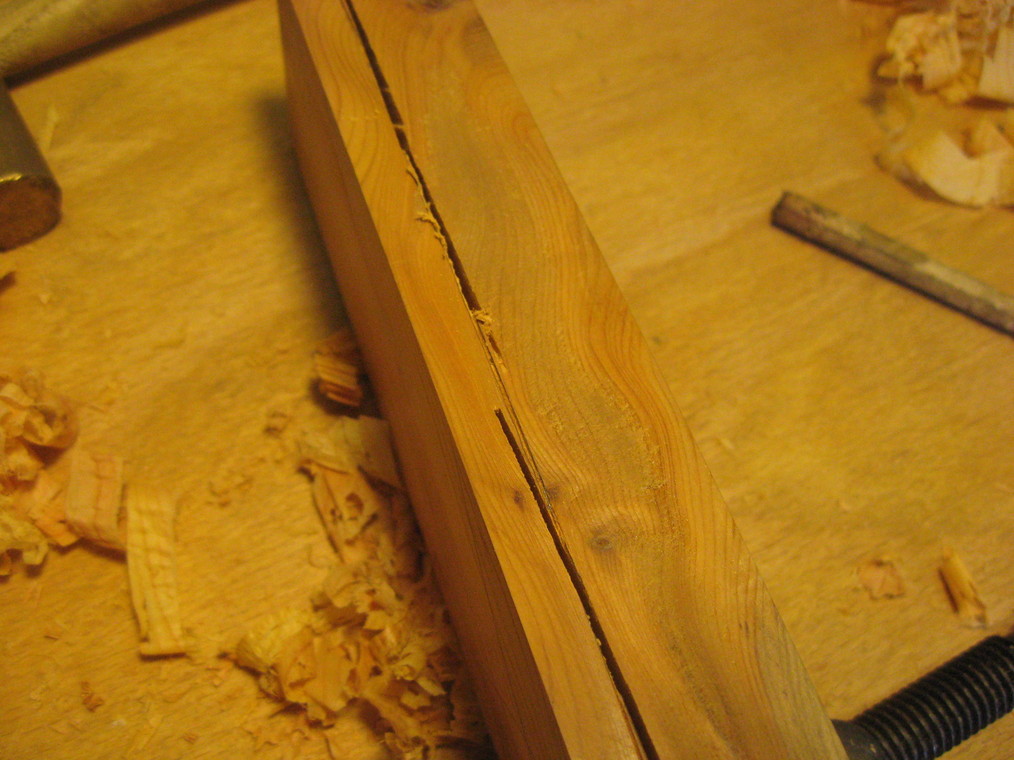 This is where
my saw went off track. You need to watch out for this. If this happens, try
starting a new cut from the other side. Also, this is why we added some slack
when marking out the thickness.
This is where
my saw went off track. You need to watch out for this. If this happens, try
starting a new cut from the other side. Also, this is why we added some slack
when marking out the thickness.
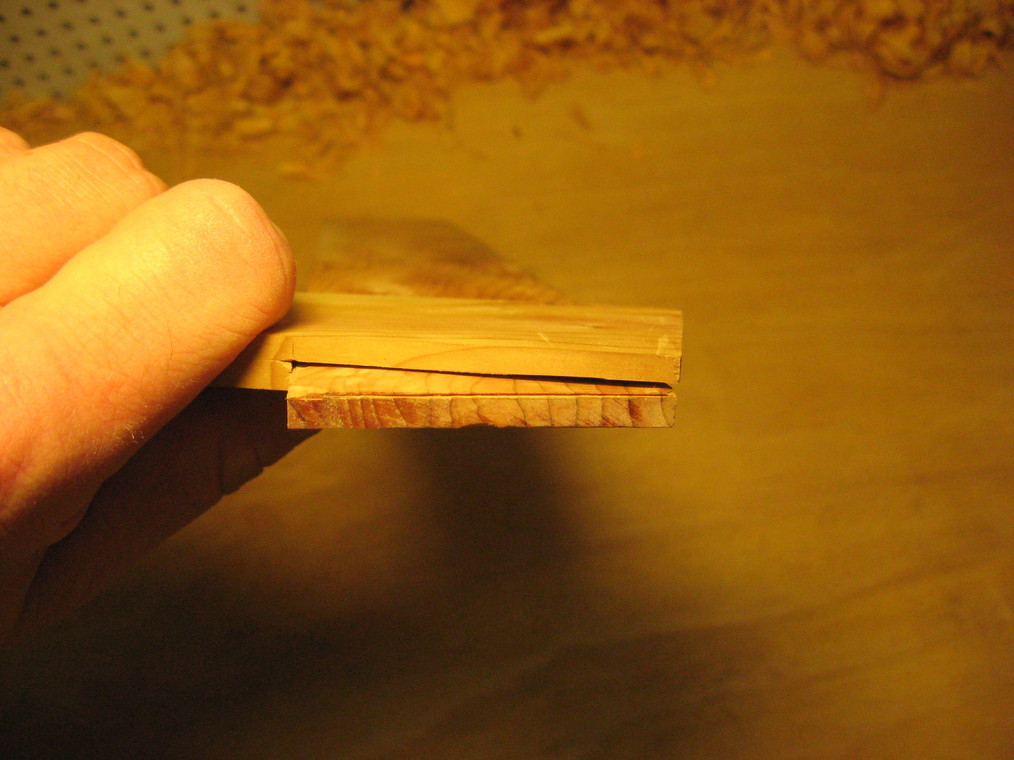
 Now it's rinse and repeat. Before resawing our second piece, we first need
to establish a new flat reference face, though.
Now it's rinse and repeat. Before resawing our second piece, we first need
to establish a new flat reference face, though.
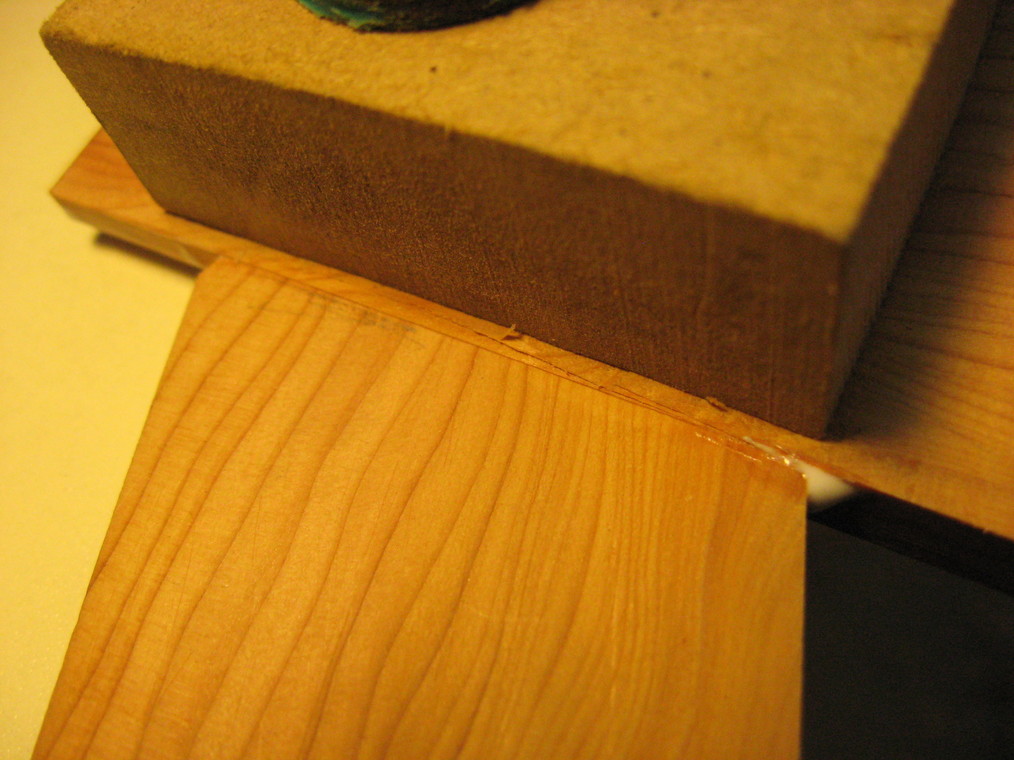
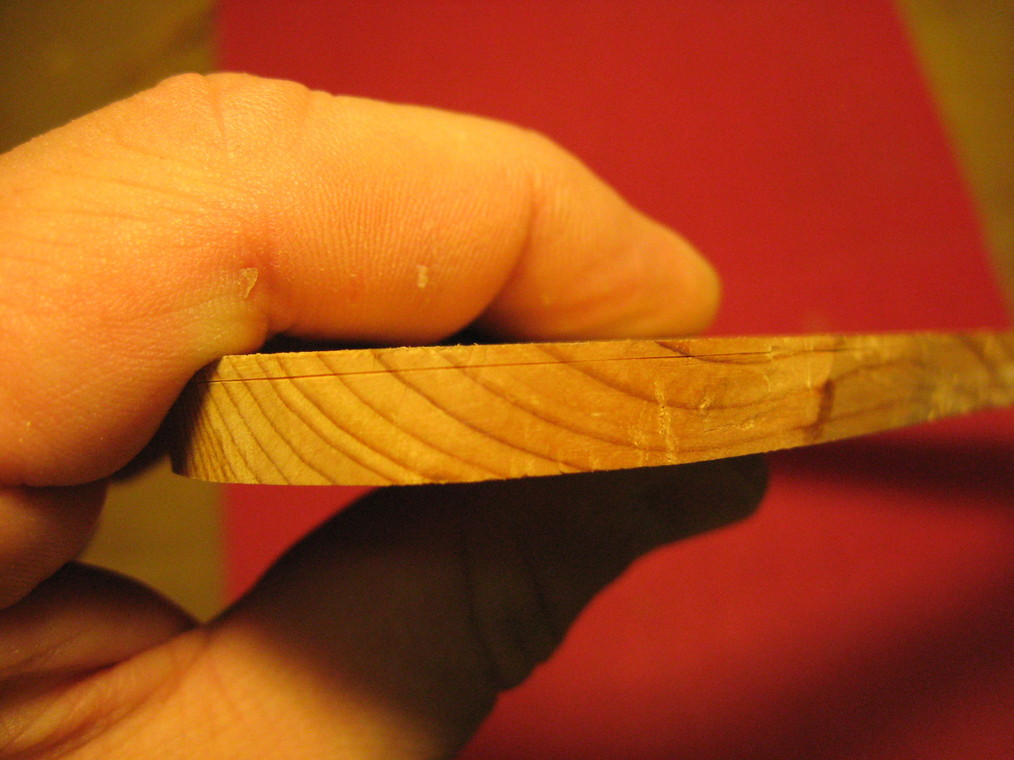
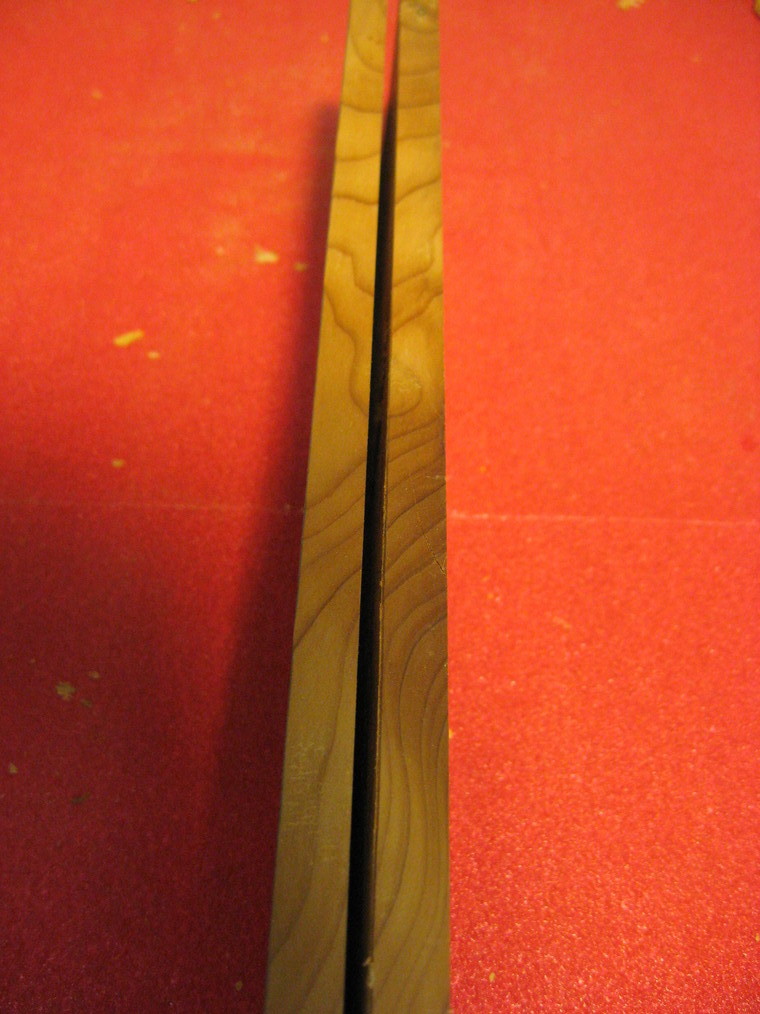 These are the two boards that will
become the two wings. Note the continuous grain pattern across the two edges.
These are the two boards that will
become the two wings. Note the continuous grain pattern across the two edges.
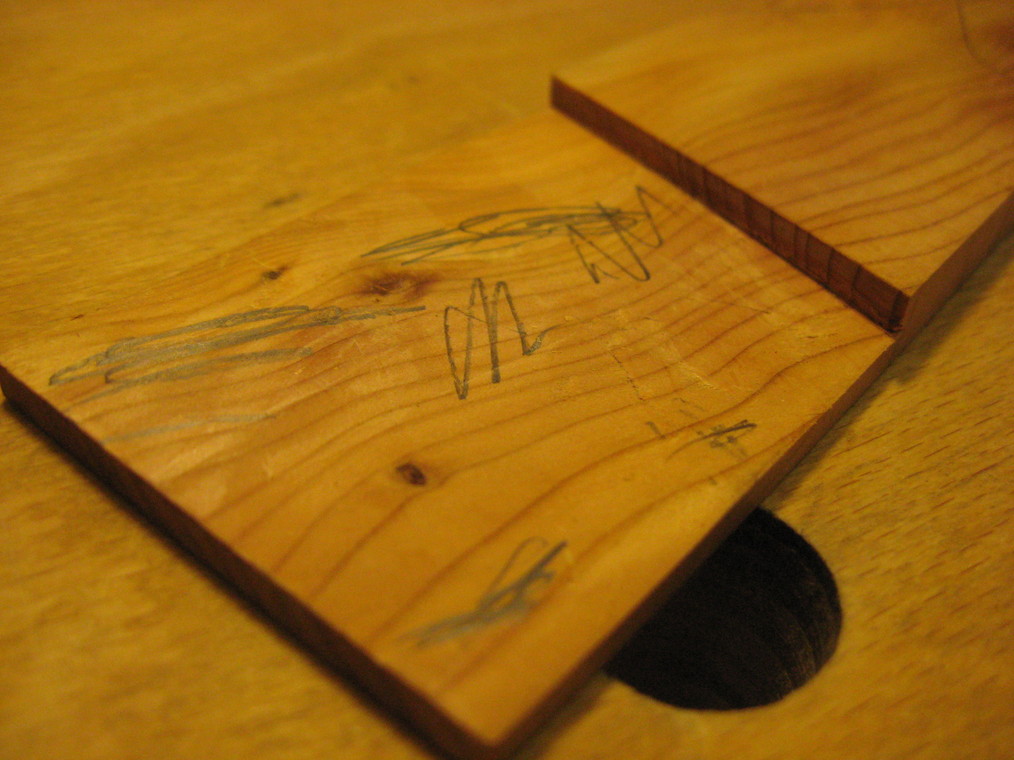
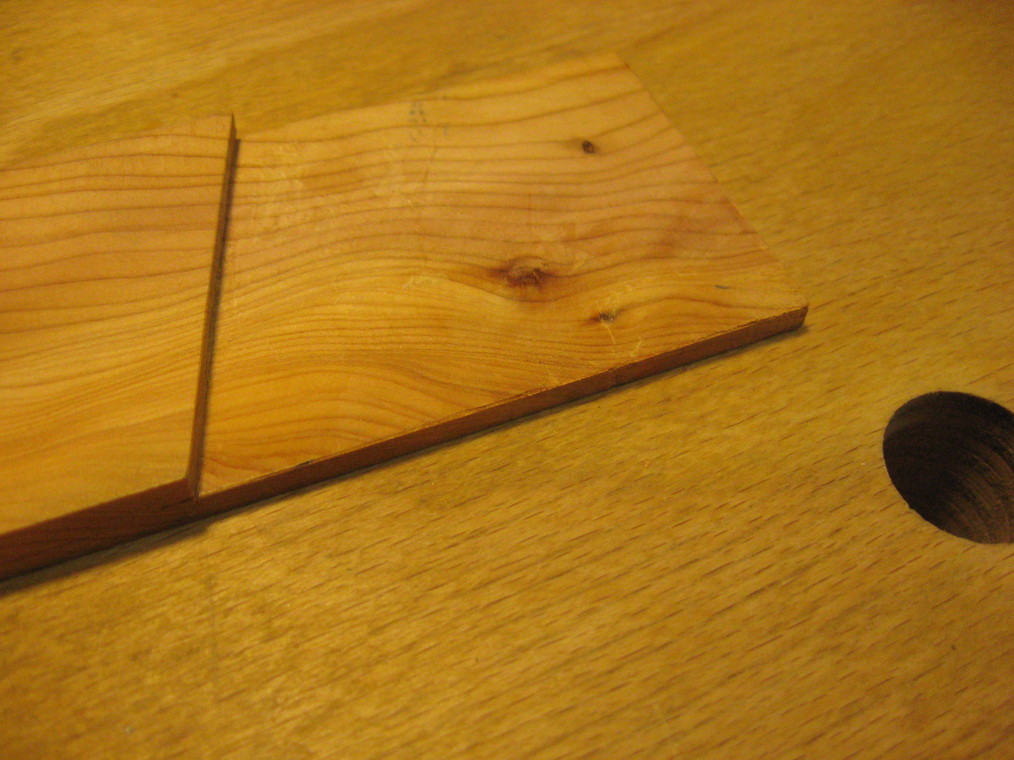
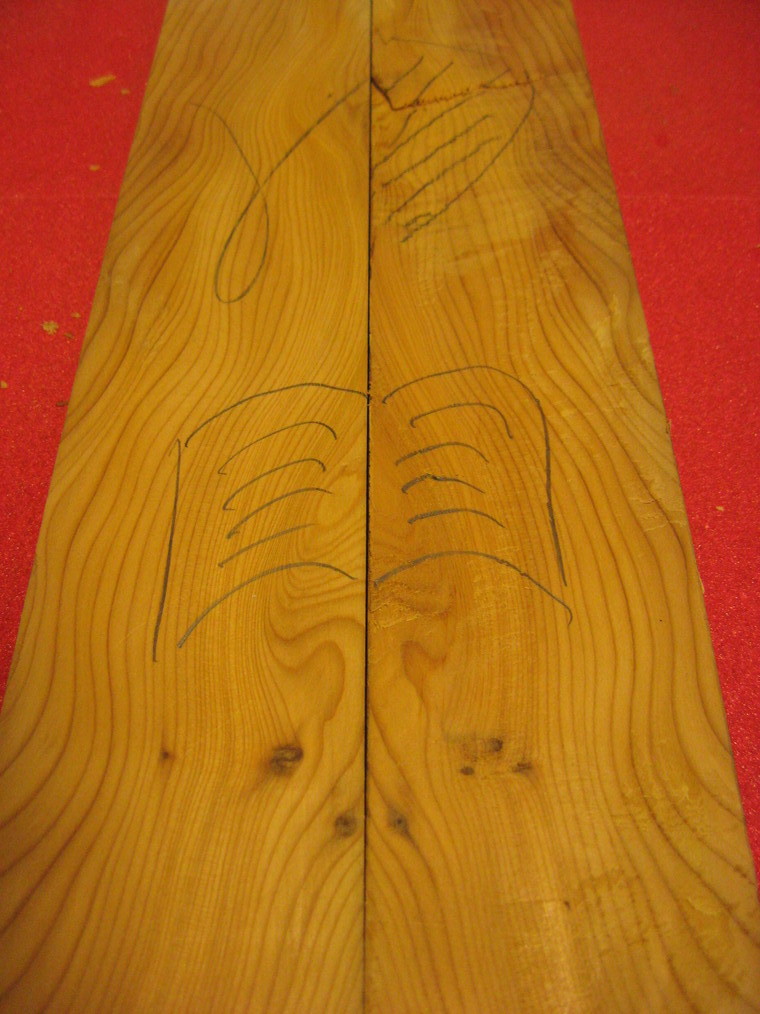 I unfold the two pieces like a book (note the cute "book" drawing on the boards), yielding a nicely symmetric
figure. This is how I will arrange the two pieces in the final boomerang. The hatched area on the top right is
my little sawing blooper from above.
I unfold the two pieces like a book (note the cute "book" drawing on the boards), yielding a nicely symmetric
figure. This is how I will arrange the two pieces in the final boomerang. The hatched area on the top right is
my little sawing blooper from above.
Laying Out and Cutting the Joint
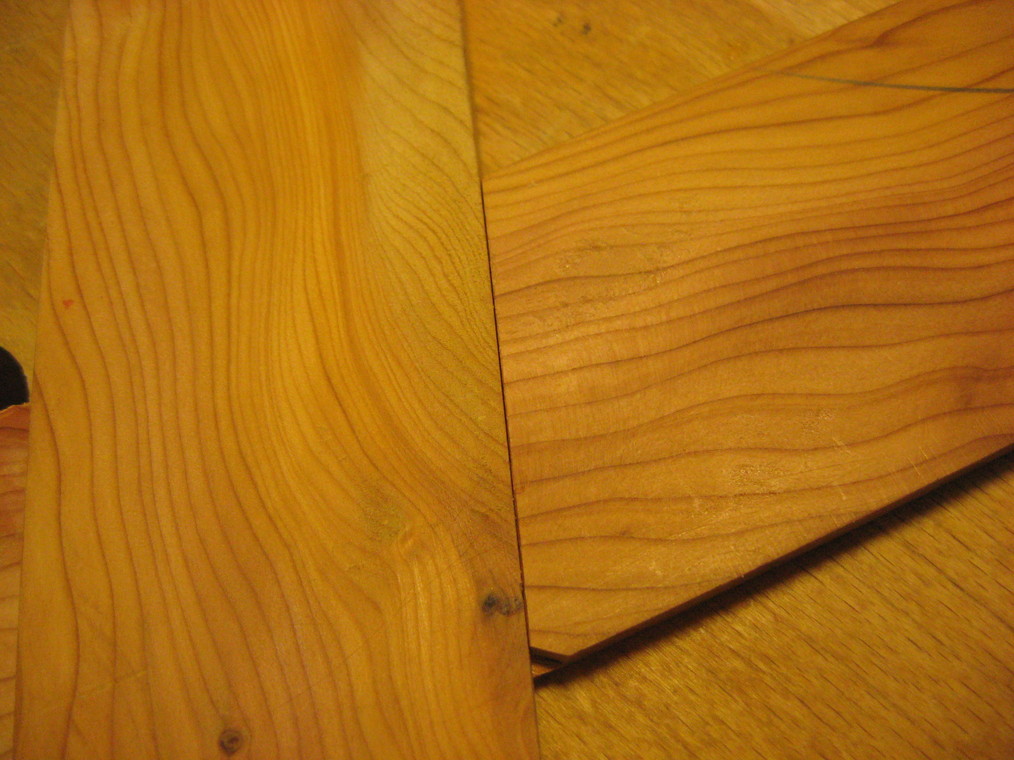
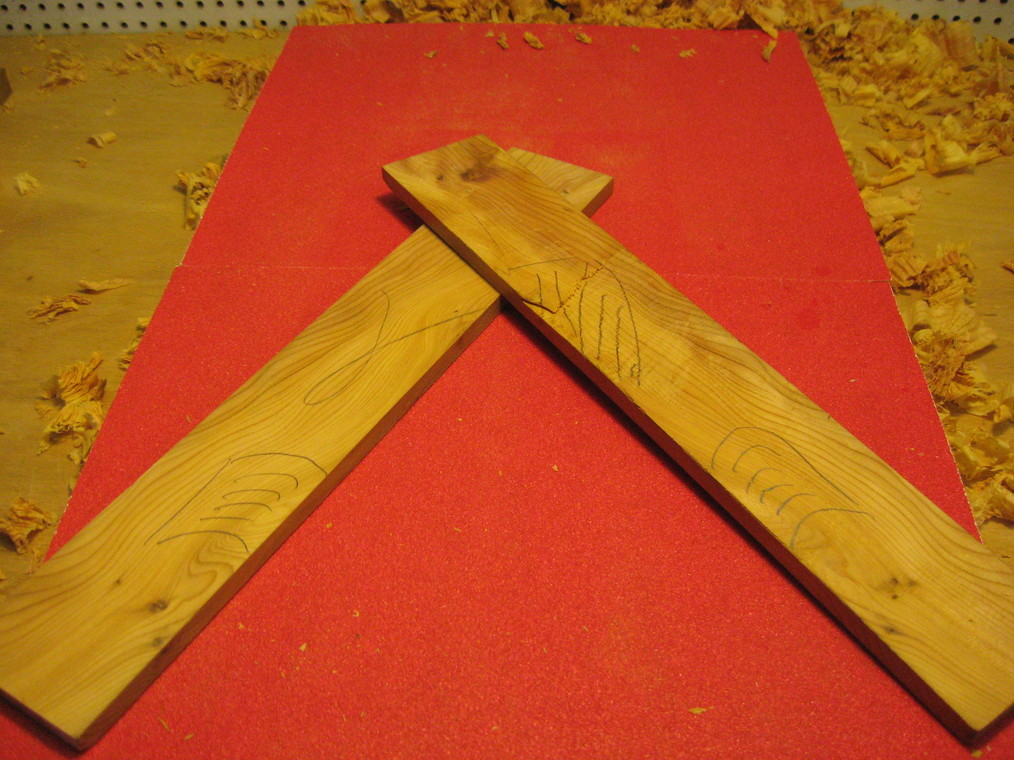 Arranged like this, the pieces start to look like a boomerang. I prefer this orientation – the lead
arm on top of the dingle arm at the elbow – because I think it is better behaved
in terms of warping (see explanation at the end of this article).
Arranged like this, the pieces start to look like a boomerang. I prefer this orientation – the lead
arm on top of the dingle arm at the elbow – because I think it is better behaved
in terms of warping (see explanation at the end of this article).
 I shoot the edges of the two boards flat and square, using the planing aid like a shooting board. Only the inside edge of each wing is important, as that is the part involved in the joint.
 I check for square against a light
source. This is good enough for me.
I check for square against a light
source. This is good enough for me.
 Eyeballing the angle -
I usually aim for something like 75° - I put the boards together at the elbow and scribe a line along the edge
of one board. This will be the shoulder of the lap joint. Technically, I should scribe the other way around, with the bevel of the knife to the waste side, as
it will dent the scribe line slightly.
Eyeballing the angle -
I usually aim for something like 75° - I put the boards together at the elbow and scribe a line along the edge
of one board. This will be the shoulder of the lap joint. Technically, I should scribe the other way around, with the bevel of the knife to the waste side, as
it will dent the scribe line slightly.
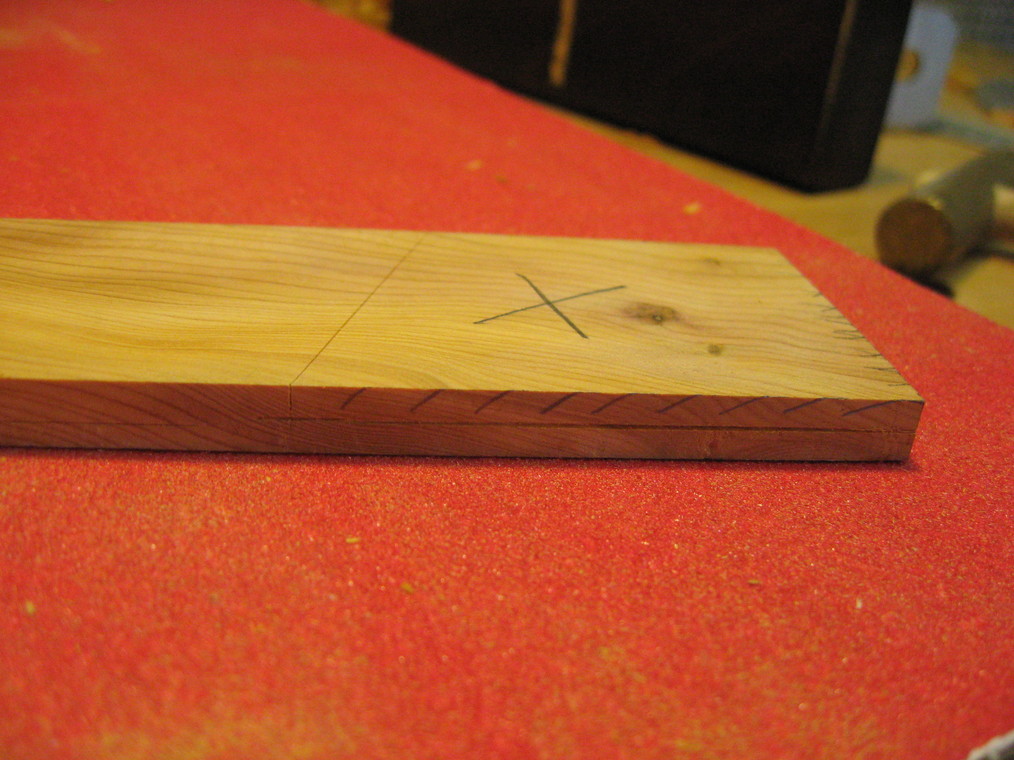 I square down the
shoulder line and add a scribe line showing half the thickness of the wood, marking out what will become the cheek
of the joint. To find the middle of the board, set your marking gauge by eye
and try from both sides. I leave the marking gauge at
the same setting and use that to mark the second wing, too. I mark both wings from the back of the boomerang. That
way, I try to get a joint that is as flat as possible on the back of the boomerang, while on the front, there is
more room for corrections in the shaping process.
I square down the
shoulder line and add a scribe line showing half the thickness of the wood, marking out what will become the cheek
of the joint. To find the middle of the board, set your marking gauge by eye
and try from both sides. I leave the marking gauge at
the same setting and use that to mark the second wing, too. I mark both wings from the back of the boomerang. That
way, I try to get a joint that is as flat as possible on the back of the boomerang, while on the front, there is
more room for corrections in the shaping process.
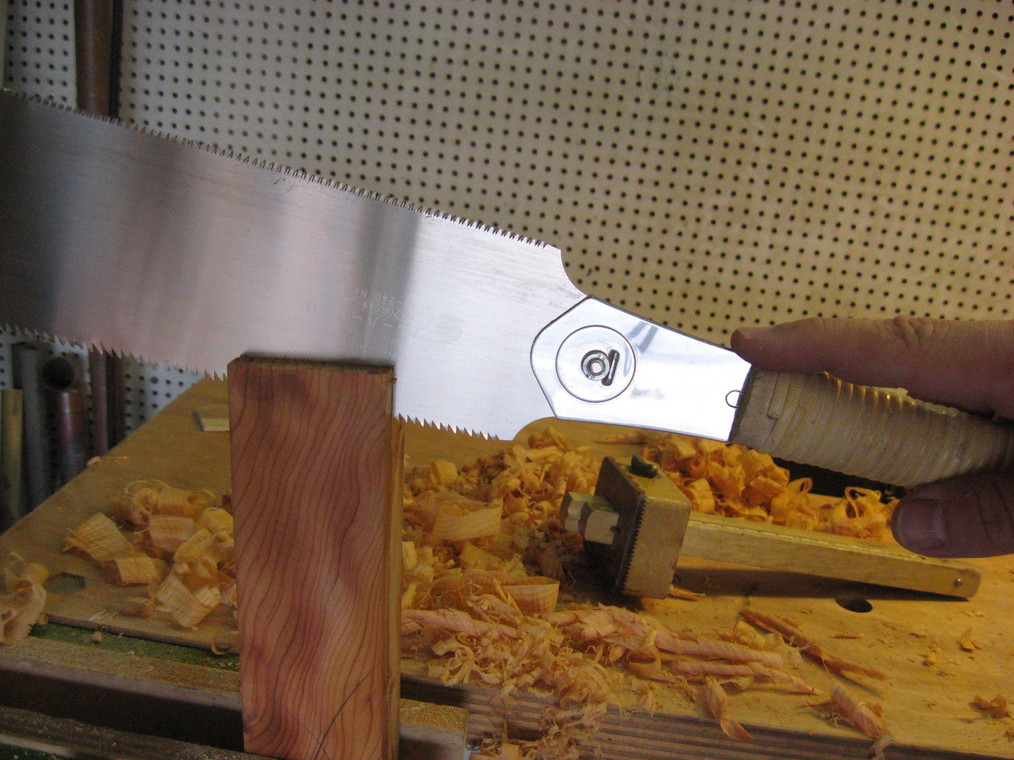
 First, I want to cross-cut
the shoulder of the lap joint. To guide the saw cut, I clamp on a piece of scrap that is straight and square and
align it with my scribed line.
First, I want to cross-cut
the shoulder of the lap joint. To guide the saw cut, I clamp on a piece of scrap that is straight and square and
align it with my scribed line.
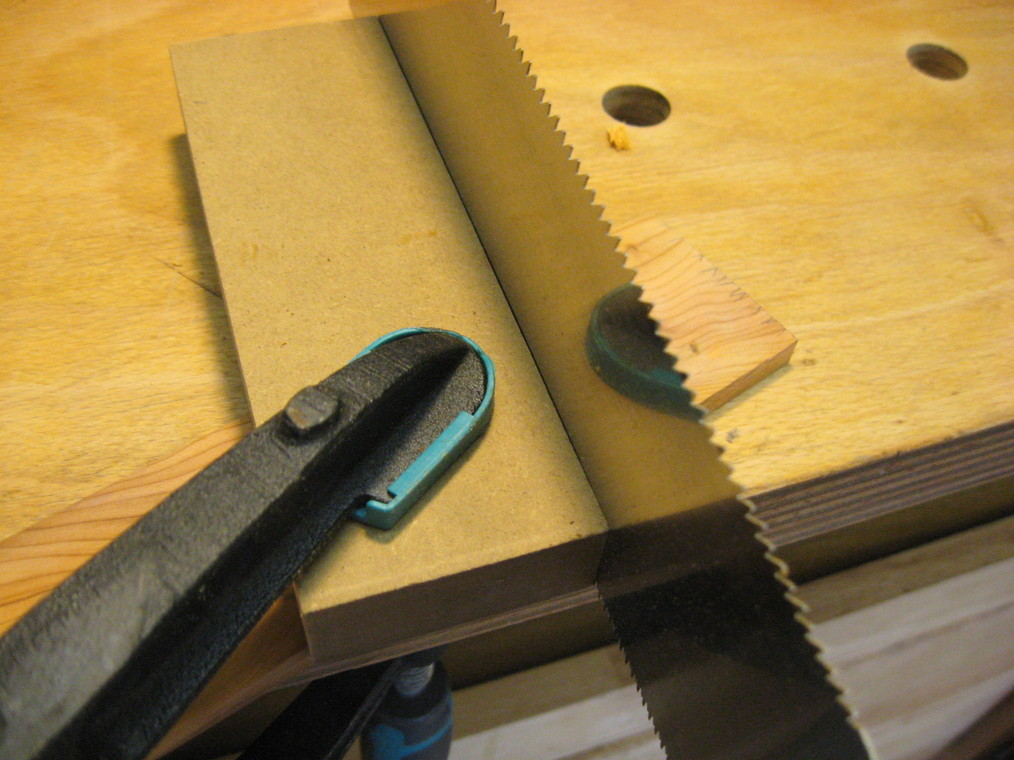 Using the guide,
I cut the shoulder, taking care not to go too deep at either end of the cut.
Using the guide,
I cut the shoulder, taking care not to go too deep at either end of the cut.
 This is what the shoulder cut looks like.
Cleaning Up and Fitting the Joint
 There are several ways to remove the waste in the lap joint. I prefer
to make a rip cut as close to the layout line as I dare, just like the rip cut used to make the two boards. This is what it looks like afterwards. If you're not sure about
sawing accurately, you can also make multiple cross cuts and chisel out the waste.
There are several ways to remove the waste in the lap joint. I prefer
to make a rip cut as close to the layout line as I dare, just like the rip cut used to make the two boards. This is what it looks like afterwards. If you're not sure about
sawing accurately, you can also make multiple cross cuts and chisel out the waste.
 Here's why I use a wide chisel. Using light, paring cuts, I clean
up the cheek of the lap joint. Know where your fingers are, and make sure they are not in front of your chisel!
Here's why I use a wide chisel. Using light, paring cuts, I clean
up the cheek of the lap joint. Know where your fingers are, and make sure they are not in front of your chisel!
 Occasionally, I check for flatness from different angles. Decide for
yourself how accurate you can be. I usually give up at some point with a "not quite perfect, but good enough" joint.
Occasionally, I check for flatness from different angles. Decide for
yourself how accurate you can be. I usually give up at some point with a "not quite perfect, but good enough" joint.
 When checking the cheek for flatness, I mark the high spots that
need some more work with the chisel; being patient here pays off in the final result.
When checking the cheek for flatness, I mark the high spots that
need some more work with the chisel; being patient here pays off in the final result.
 There will usually be some extra material right in the corner
between the two faces I have just cut. Extra care must be taken to clean that up, otherwise the joint will not
close properly.
There will usually be some extra material right in the corner
between the two faces I have just cut. Extra care must be taken to clean that up, otherwise the joint will not
close properly.
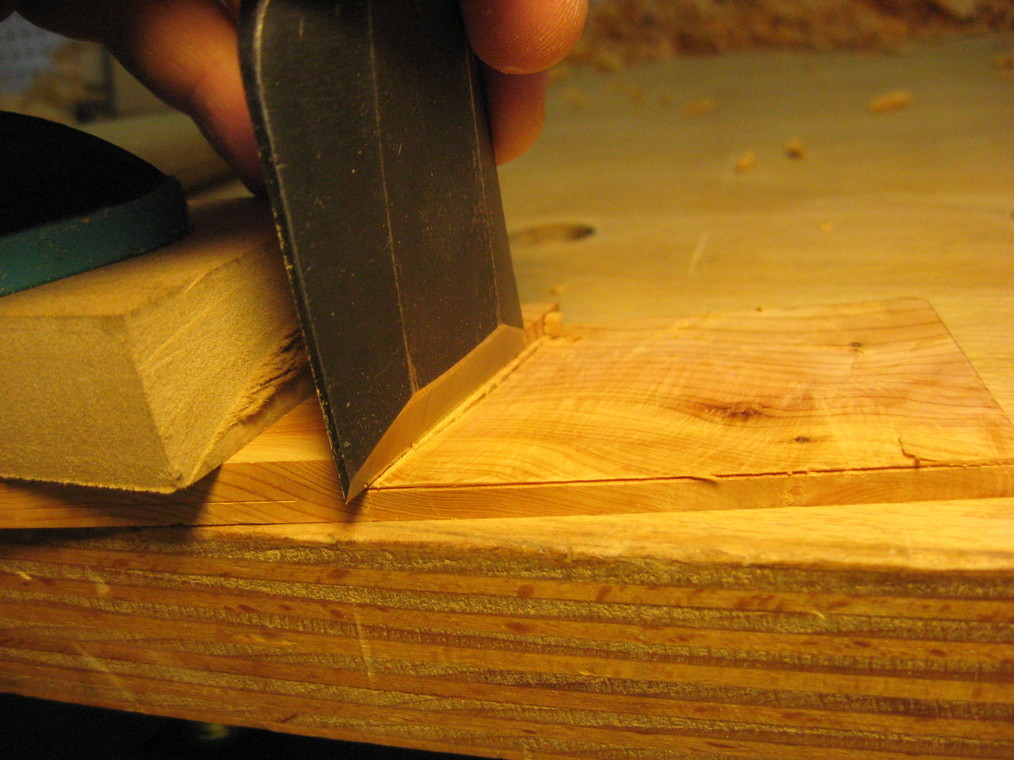
 Before working the end grain along the shoulder, I chamfer the far
end, or otherwise the wood will splinter if I plane, file or pare the shoulder in that direction.
Before working the end grain along the shoulder, I chamfer the far
end, or otherwise the wood will splinter if I plane, file or pare the shoulder in that direction.
 This is where the chisel needs to be scary sharp. I check the shoulder
with a ruler or against the mating piece, and pare the high spots very carefully, trying to make paper-thin shavings.
This is where the chisel needs to be scary sharp. I check the shoulder
with a ruler or against the mating piece, and pare the high spots very carefully, trying to make paper-thin shavings.
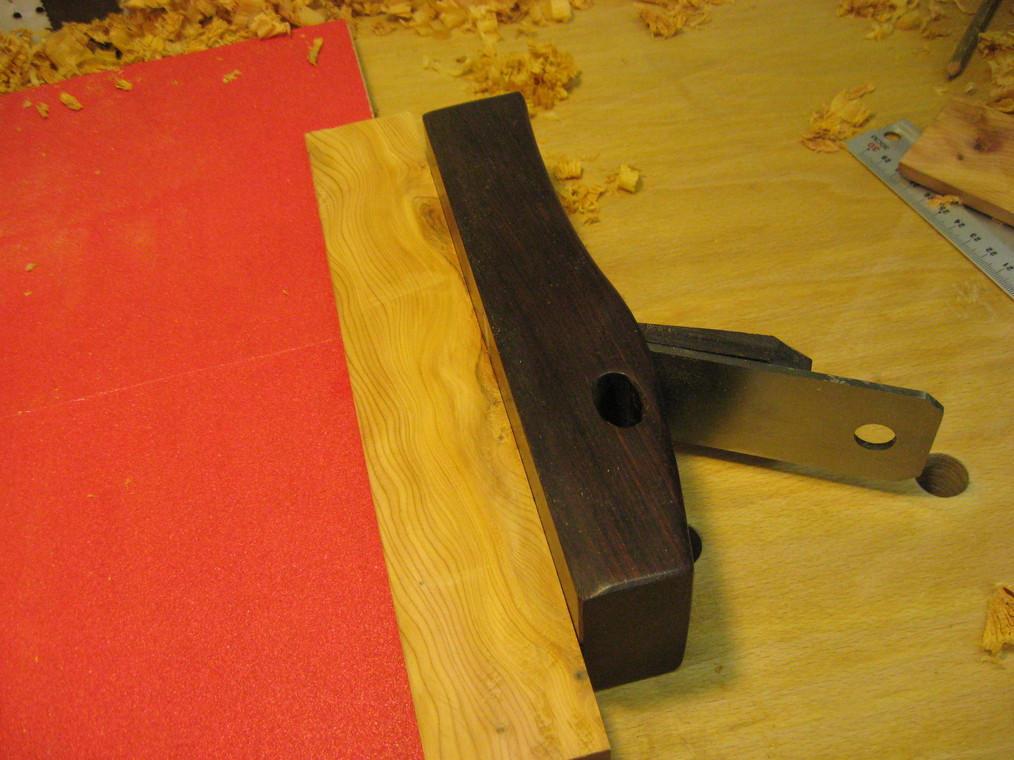
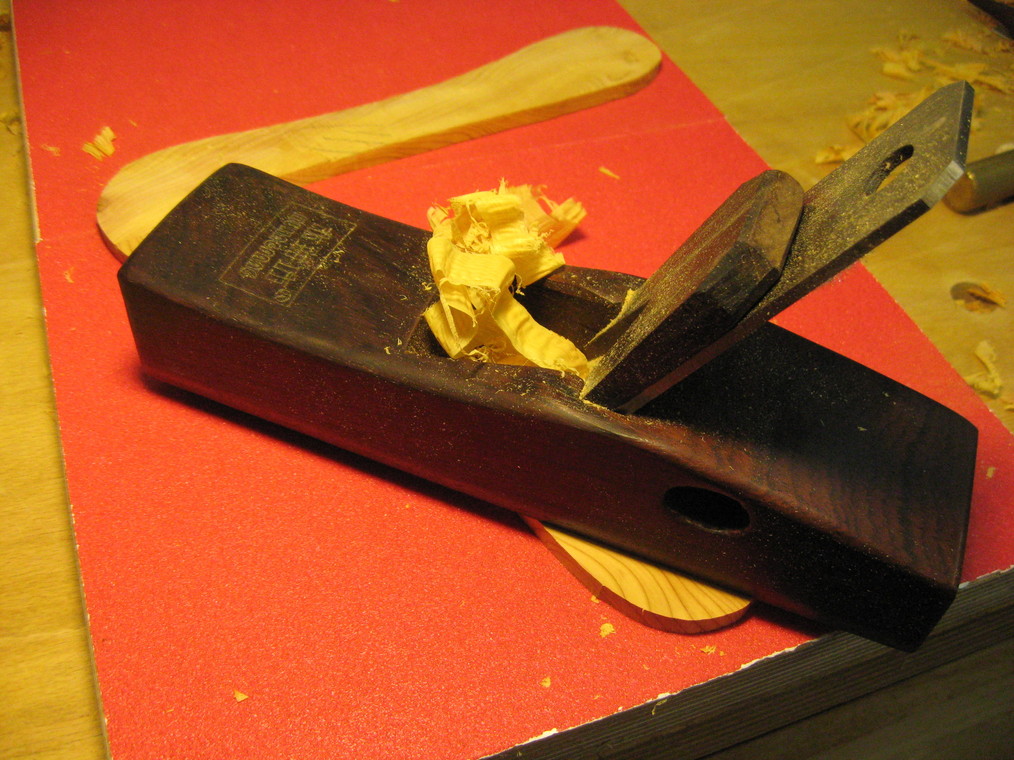
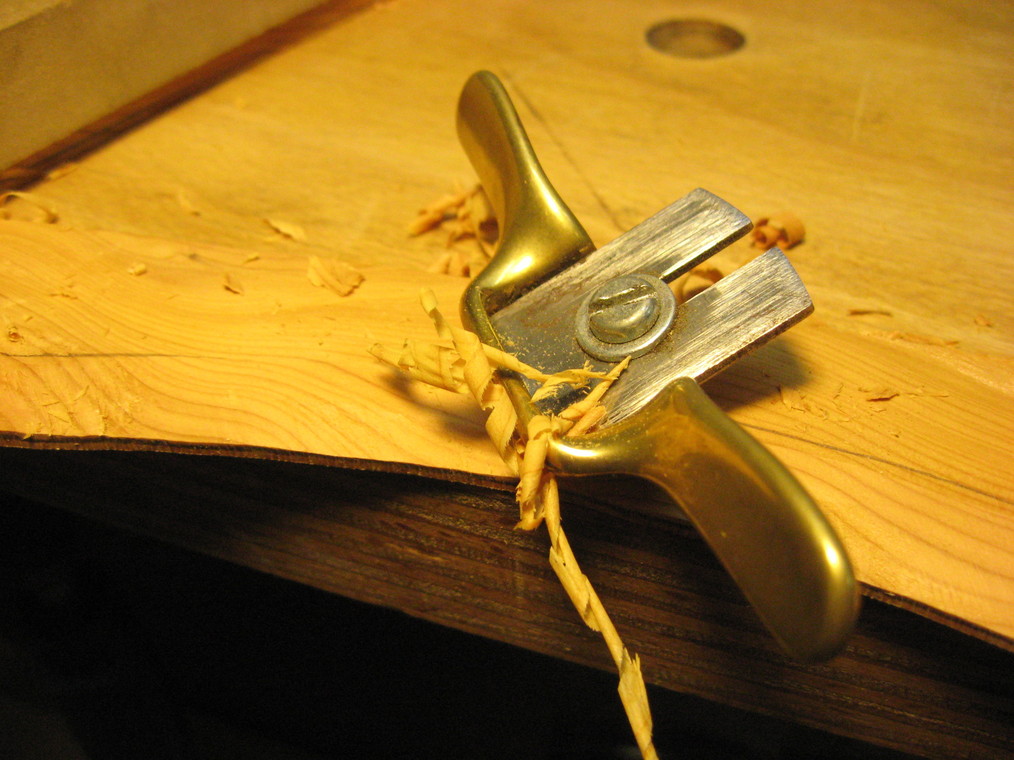
 Although the spirit of this article is to show how
to make hardwood boomerangs with basic tools, a shoulder plane makes it really easy to achieve a good fit in our lap joint. This is a Veritas Medium Shoulder
Plane, the perfect tool to trim the cheek and the shoulder
of the lap joint. You might get something like a Stanley 92 from Ebay, but those have gotten expensive, too.
Although the spirit of this article is to show how
to make hardwood boomerangs with basic tools, a shoulder plane makes it really easy to achieve a good fit in our lap joint. This is a Veritas Medium Shoulder
Plane, the perfect tool to trim the cheek and the shoulder
of the lap joint. You might get something like a Stanley 92 from Ebay, but those have gotten expensive, too.
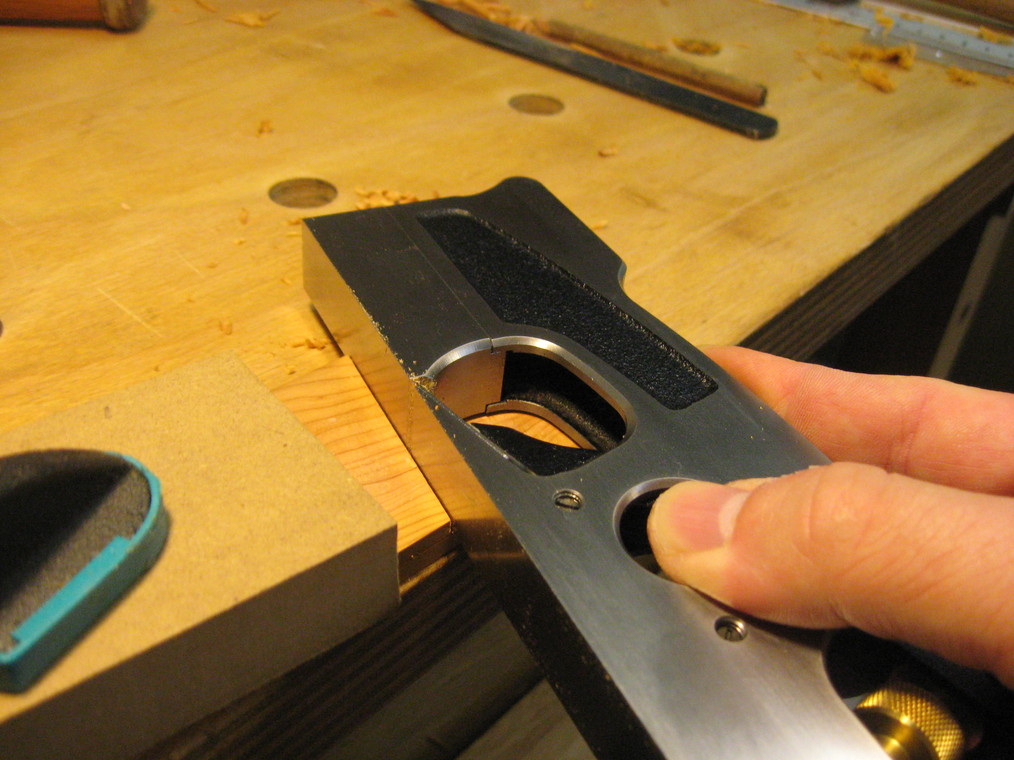 This is the shoulder plane cleaning up the, well, shoulder. To do
this, you need to chop off the far corner of the joint, otherwise there will be blow-out.
Note that I didn't cheat on you at this point :-) - I am just showing how to use the plane, I did not actually
use it on this particular boomerang.
This is the shoulder plane cleaning up the, well, shoulder. To do
this, you need to chop off the far corner of the joint, otherwise there will be blow-out.
Note that I didn't cheat on you at this point :-) - I am just showing how to use the plane, I did not actually
use it on this particular boomerang.
 At some point in the proceedings, the joint really looked this bad.
Don't worry – try to pare the two faces flat as far as possible, and check for flatness frequently.
At some point in the proceedings, the joint really looked this bad.
Don't worry – try to pare the two faces flat as far as possible, and check for flatness frequently.
 If the cheek of the joint is flat, it is time to start test
fitting. No need to worry about the tear-out on the cheek, that part will be invisible anyway. (Or so I thought;
see the picture of the joint below.)
If the cheek of the joint is flat, it is time to start test
fitting. No need to worry about the tear-out on the cheek, that part will be invisible anyway. (Or so I thought;
see the picture of the joint below.)
 This is the joint starting to look good. Note that there is still
a gap, which can have multiple reasons: perhaps there is some material left in the corner between the shoulder
and the cheek, or the shoulder and/or the mating piece are not perpendicular to the cheek.
This part is where I spend most of the time, usually. It is just a matter of test-fitting, paring, correcting,
more test fitting, etc.
This is the joint starting to look good. Note that there is still
a gap, which can have multiple reasons: perhaps there is some material left in the corner between the shoulder
and the cheek, or the shoulder and/or the mating piece are not perpendicular to the cheek.
This part is where I spend most of the time, usually. It is just a matter of test-fitting, paring, correcting,
more test fitting, etc.
 If the shoulder and the mating edges of the other wing are not parallel
both on the front and back, I leave the shoulder of the joint alone and rather try to fit the mating edge. This can be
done much more easily with the plane than fiddling around with the shoulder that we just worked hard to get straight.
If the shoulder and the mating edges of the other wing are not parallel
both on the front and back, I leave the shoulder of the joint alone and rather try to fit the mating edge. This can be
done much more easily with the plane than fiddling around with the shoulder that we just worked hard to get straight.
Glue-Up and Finishing the Blank
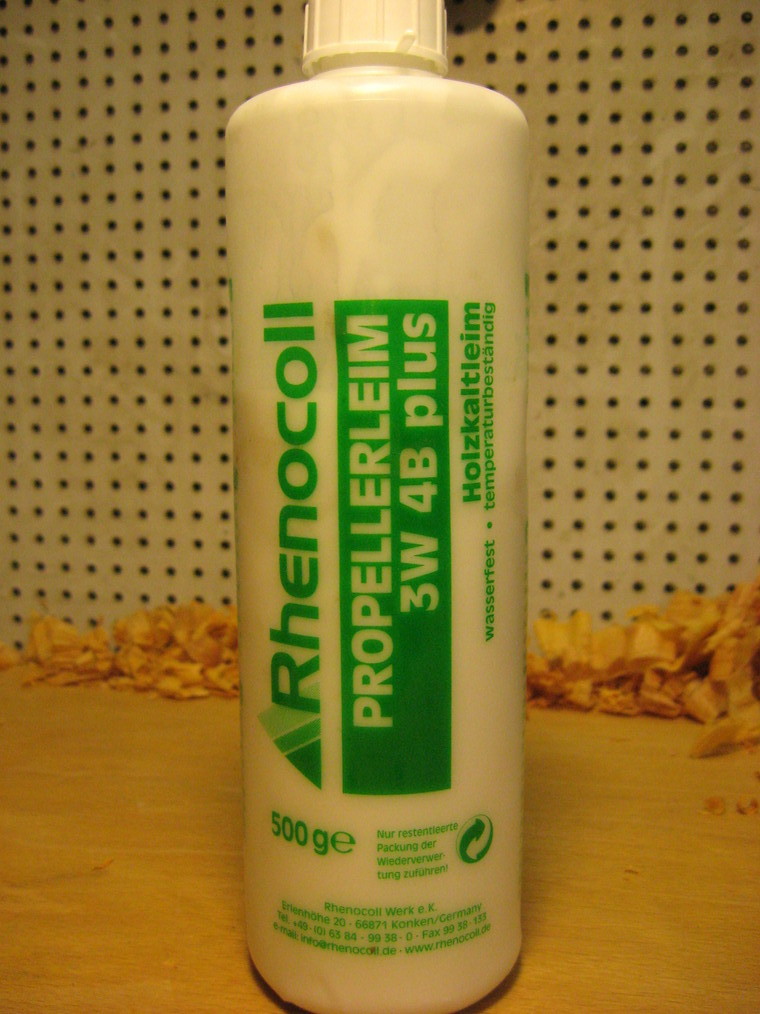 This is the glue I prefer, called Rhenocoll
Propellerleim ("propeller glue"). Any water resistant PVA glue, such as
Titebond III, will work fine.
This is the glue I prefer, called Rhenocoll
Propellerleim ("propeller glue"). Any water resistant PVA glue, such as
Titebond III, will work fine.
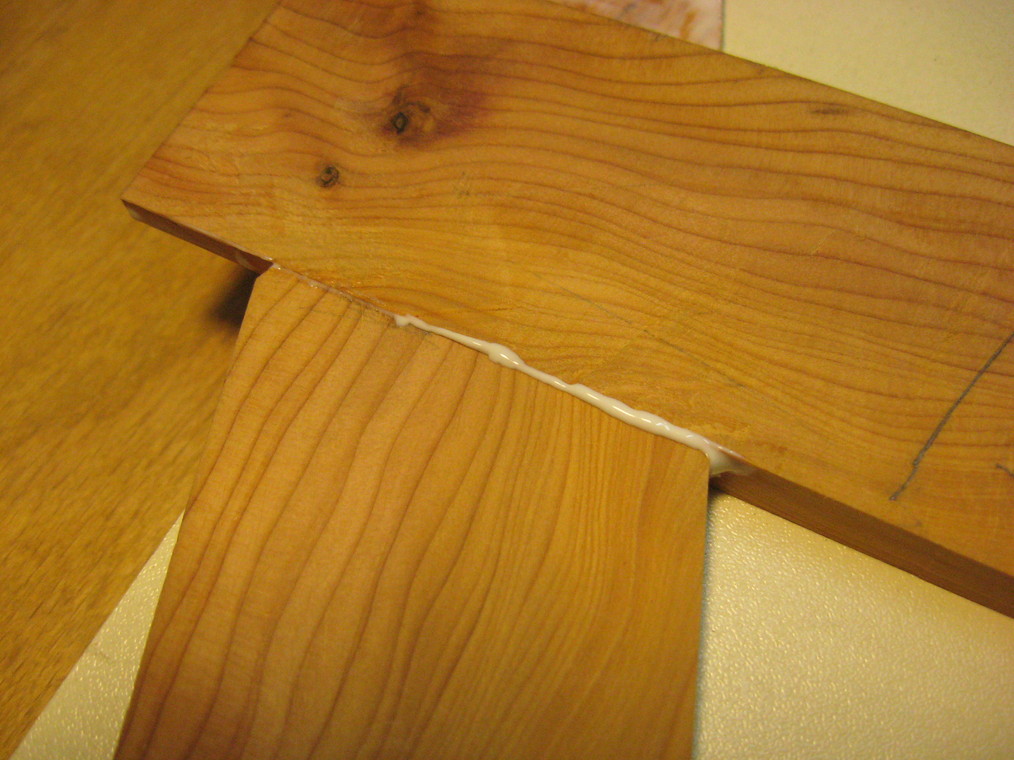 For the last time, I check that the joint is fitting and everything
lines up nicely. I spread some glue on all faces of the joint and align the pieces. There should be just a little
glue squeeze-out.
For the last time, I check that the joint is fitting and everything
lines up nicely. I spread some glue on all faces of the joint and align the pieces. There should be just a little
glue squeeze-out.
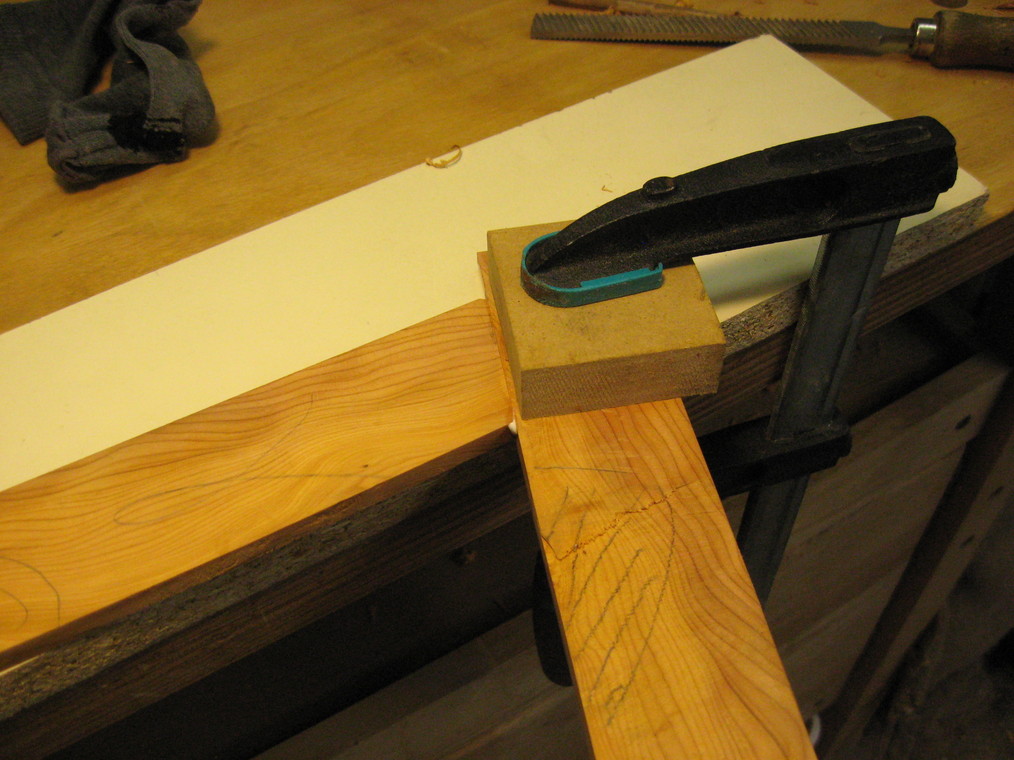 I clamp the boomerang down on the bench, supported by a piece of
plastic-coated scrap so the glue won't stick. I use a block of scrap to spread the clamping pressure. I let the lead arm overhang
the edge of the bench so that the actual joint area gets clamped tightly even if there is a slight step between the two pieces on the backside.
I clamp the boomerang down on the bench, supported by a piece of
plastic-coated scrap so the glue won't stick. I use a block of scrap to spread the clamping pressure. I let the lead arm overhang
the edge of the bench so that the actual joint area gets clamped tightly even if there is a slight step between the two pieces on the backside.
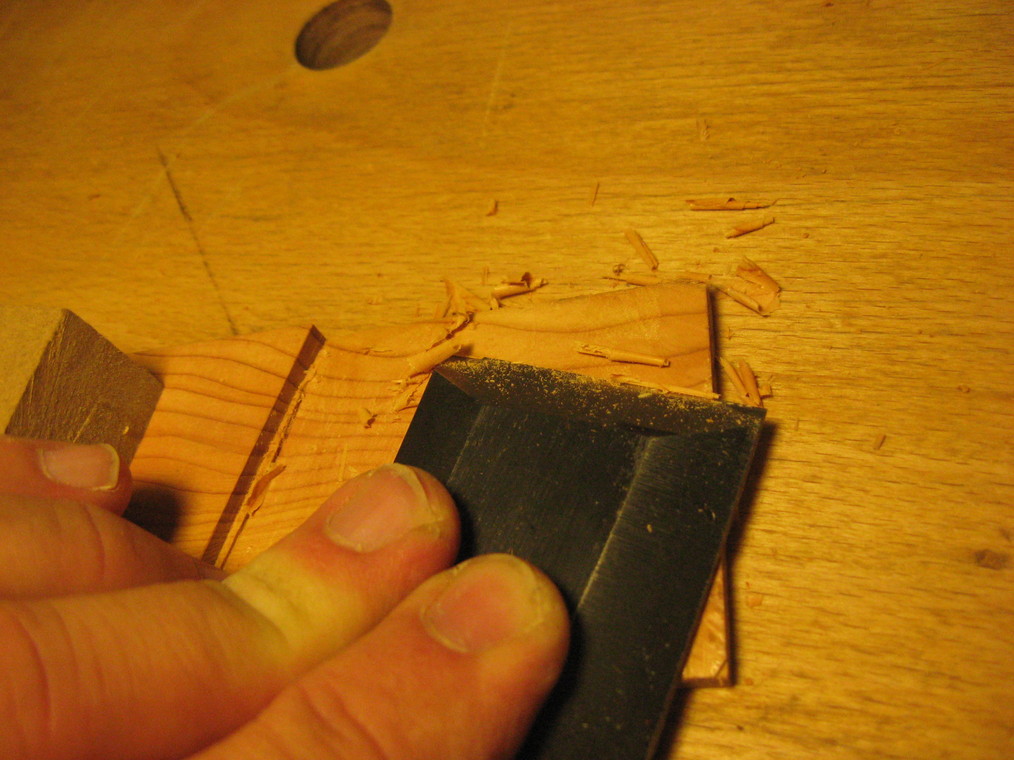
 After the glue has started to get a rubbery consistency, I scrape
away the excess and check if the glue line is nice and crisp. On the other hand, there is not much you can do if
the glue line looks messy at this point.
After the glue has started to get a rubbery consistency, I scrape
away the excess and check if the glue line is nice and crisp. On the other hand, there is not much you can do if
the glue line looks messy at this point.
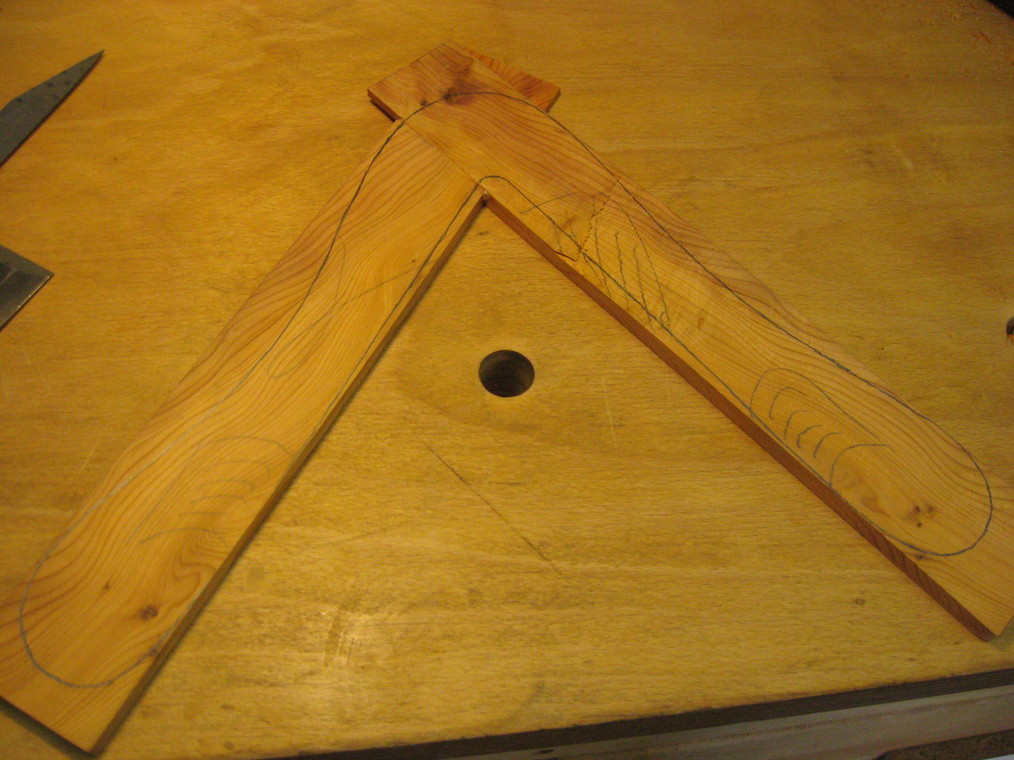 After the glue has dried, I can now trace my boomerang pattern on
the blank. The shapes I use usually have flared wing tips and a dingle arm that is about 1-1.5 cm (1/2") longer
than the lead arm.
From here, you can use whatever method you would use to make boomerangs from birch plywood. As we are working
with solid wood, though, there are some options I would like to show which would not work so well with plywood,
but are fast and easy with solid wood.
After the glue has dried, I can now trace my boomerang pattern on
the blank. The shapes I use usually have flared wing tips and a dingle arm that is about 1-1.5 cm (1/2") longer
than the lead arm.
From here, you can use whatever method you would use to make boomerangs from birch plywood. As we are working
with solid wood, though, there are some options I would like to show which would not work so well with plywood,
but are fast and easy with solid wood.
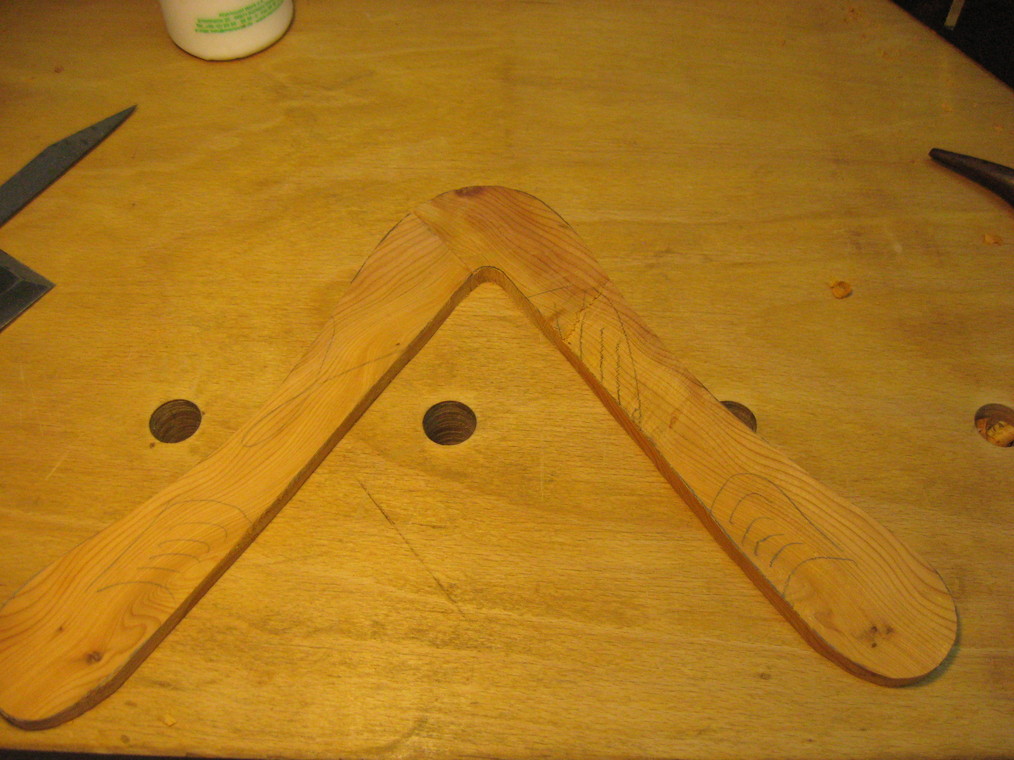 This is just my shape cut out with a fretsaw and after some minor
clean-up of the outline with a spokeshave. It turns out that this yew likes to tear out, so I need to proceed carefully and avoid using edge tools against the grain.
This is just my shape cut out with a fretsaw and after some minor
clean-up of the outline with a spokeshave. It turns out that this yew likes to tear out, so I need to proceed carefully and avoid using edge tools against the grain.
 The first order of business now is to get the back side of the
boomerang flat. I check frequently against my bench top and with a ruler and plane away the high spots, making sure the back side is flat
along each wing as well as across both wingtips.
The first order of business now is to get the back side of the
boomerang flat. I check frequently against my bench top and with a ruler and plane away the high spots, making sure the back side is flat
along each wing as well as across both wingtips.
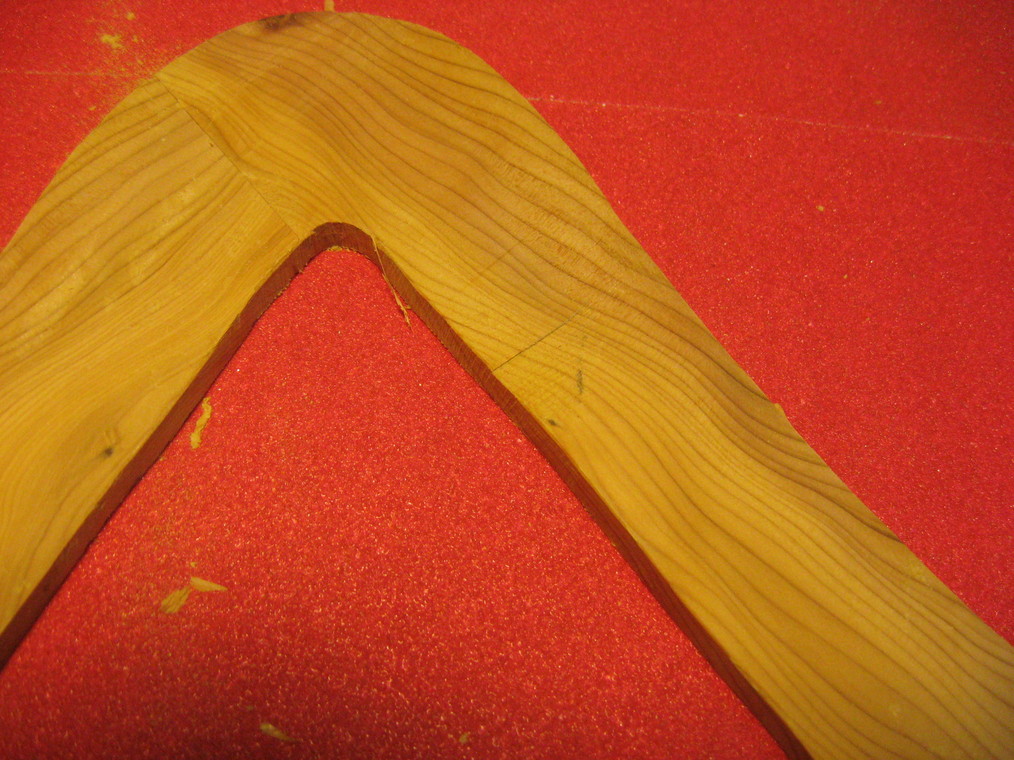
 This is a close-up view of the lap joint. It turned out so-so:
there is a small gap and the glue line is not perfectly parallel to the back side.
I fill the gap with some sawdust mixed with glue. There is nothing to be done about the slightly skewed glue line,
but never mind.
This is a close-up view of the lap joint. It turned out so-so:
there is a small gap and the glue line is not perfectly parallel to the back side.
I fill the gap with some sawdust mixed with glue. There is nothing to be done about the slightly skewed glue line,
but never mind.
 When the back of the boomerang is flat, I can mark out the final
thickness. I use the marking gauge to scribe a line about 6.5 mm (1/4") from the back.
When the back of the boomerang is flat, I can mark out the final
thickness. I use the marking gauge to scribe a line about 6.5 mm (1/4") from the back.
 Using the planing board, I plane all of the front face of the
boomerang to the final thickness. It is easy to go too far, so take your time.
Using the planing board, I plane all of the front face of the
boomerang to the final thickness. It is easy to go too far, so take your time.
 This is the boomerang blank at its final thickness. Note that the
problem area from my sawing blooper has almost disappeared.
This is the boomerang blank at its final thickness. Note that the
problem area from my sawing blooper has almost disappeared.
Shaping the Boomerang
Shaping
 Clamping the boomerang to the table for shaping. Extra care should
be taken to support the wood well at all times, at it is not quite as tough as the plywood we usually work with.
Clamping the boomerang to the table for shaping. Extra care should
be taken to support the wood well at all times, at it is not quite as tough as the plywood we usually work with.
 I use a small spokeshave to shape most of the airfoil. Again, this
particular piece of yew turned out to be quite nasty because of the swirly grain, so I need to work from different
angles and be very careful not to produce deep tear-out as on the left hand side of this picture.
I use a small spokeshave to shape most of the airfoil. Again, this
particular piece of yew turned out to be quite nasty because of the swirly grain, so I need to work from different
angles and be very careful not to produce deep tear-out as on the left hand side of this picture.
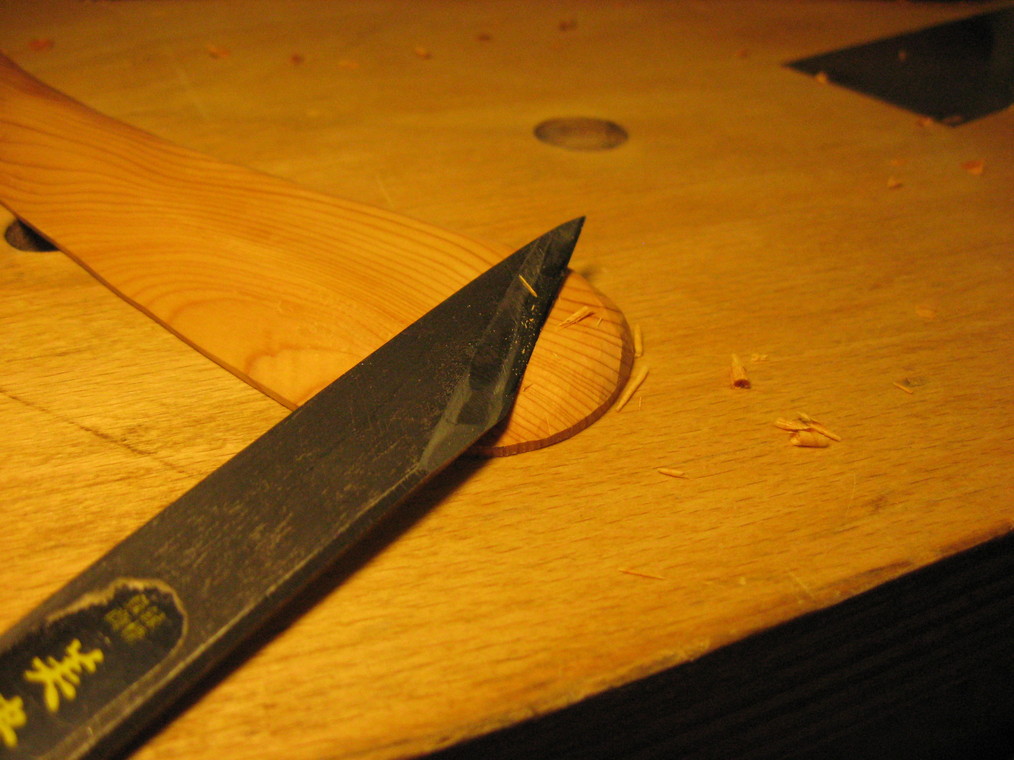 For the tips of the wings and the elbow area, I use a
carving knife to get as close to the desired shape as possible. Be extra careful here – these knives are razor sharp.
For the tips of the wings and the elbow area, I use a
carving knife to get as close to the desired shape as possible. Be extra careful here – these knives are razor sharp.
 This is as good as it gets for me with the knife. From here, I'll
continue with the card scraper.
This is as good as it gets for me with the knife. From here, I'll
continue with the card scraper.
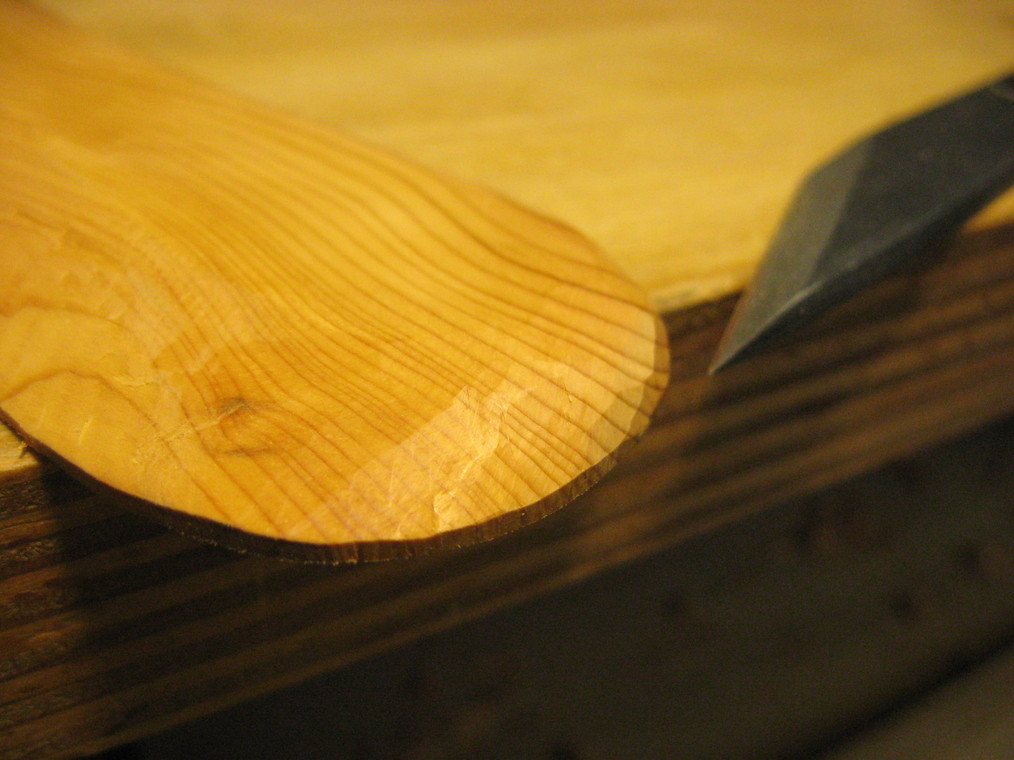
 With the card scraper, very smooth surfaces can be achieved.
The only problem area where I find a card scraper does not work very well is the elbow, where two different grain
directions meet.
Depending on the structure and species of the wood, it is possible to shape a whole boomerang using only a spokeshave,
a carving knife and card scrapers. With this particular piece of wood, though, I decided to abandon edge tools at
this point and resort to hand sanding to avoid tear-out, making sure to wear a face mask because of the sanding dust.
With the card scraper, very smooth surfaces can be achieved.
The only problem area where I find a card scraper does not work very well is the elbow, where two different grain
directions meet.
Depending on the structure and species of the wood, it is possible to shape a whole boomerang using only a spokeshave,
a carving knife and card scrapers. With this particular piece of wood, though, I decided to abandon edge tools at
this point and resort to hand sanding to avoid tear-out, making sure to wear a face mask because of the sanding dust.
The Finish Line
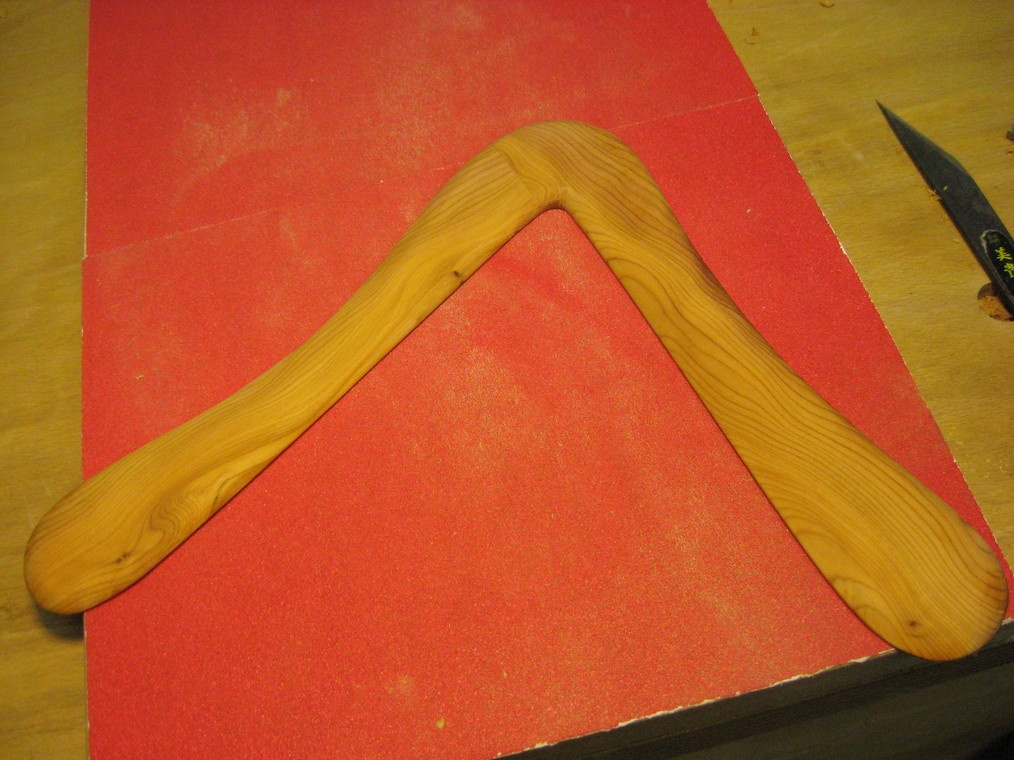 This is the boomerang sanded to 320 grit. I cheated a little for
this picture and wiped the boomerang with some alcohol to highlight the figure.
There is no finish applied yet because firstly, I like to get some test throws before finishing, and secondly,
I haven't decided yet if I will use tung oil or some clear spray paint.
This is the boomerang sanded to 320 grit. I cheated a little for
this picture and wiped the boomerang with some alcohol to highlight the figure.
There is no finish applied yet because firstly, I like to get some test throws before finishing, and secondly,
I haven't decided yet if I will use tung oil or some clear spray paint.
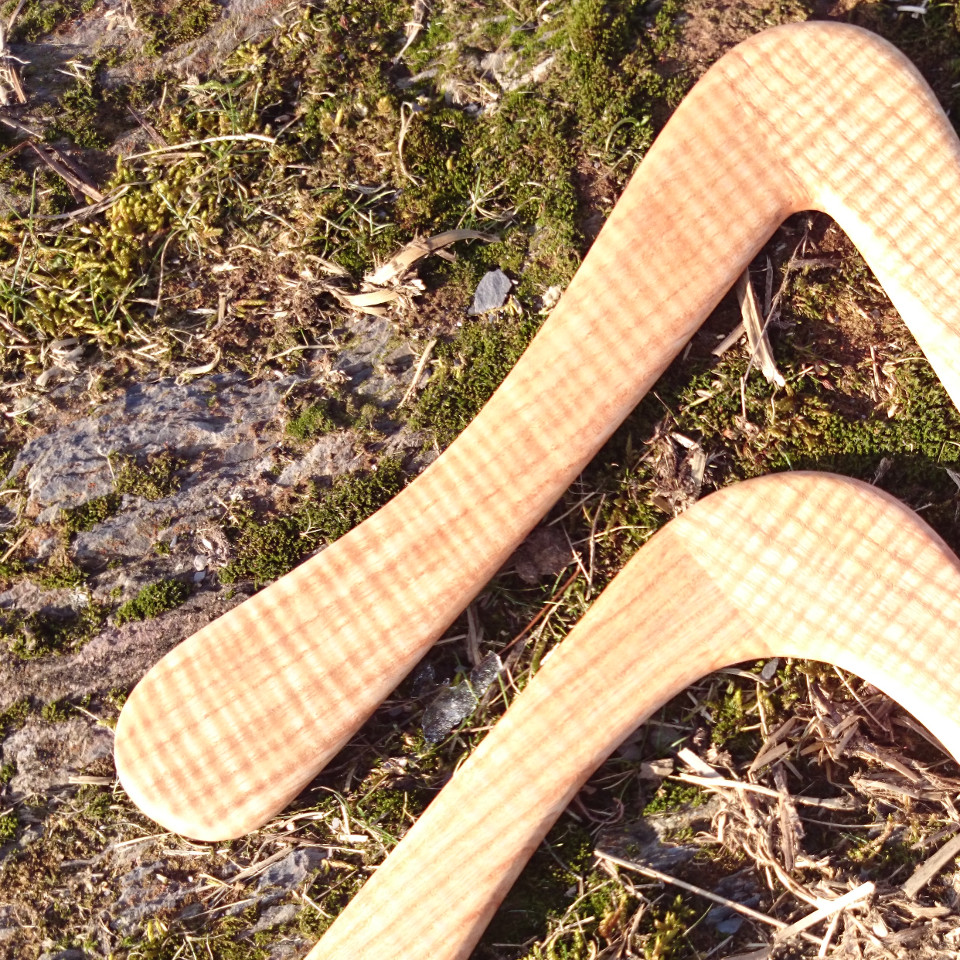
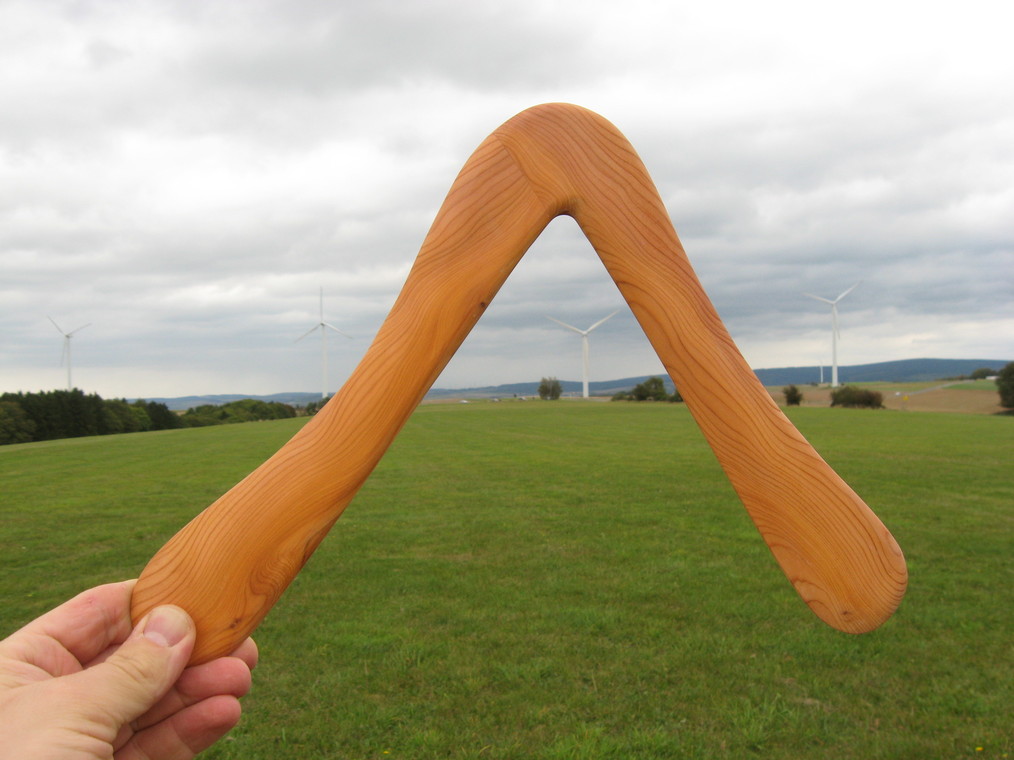 My new friend in its natural habitat.
 Some days and some test throws later... This is how the finished
rang looks after a couple of coats of tung oil and polished with a little beeswax.
Some days and some test throws later... This is how the finished
rang looks after a couple of coats of tung oil and polished with a little beeswax.
Appendix
Lap Joint Pattern

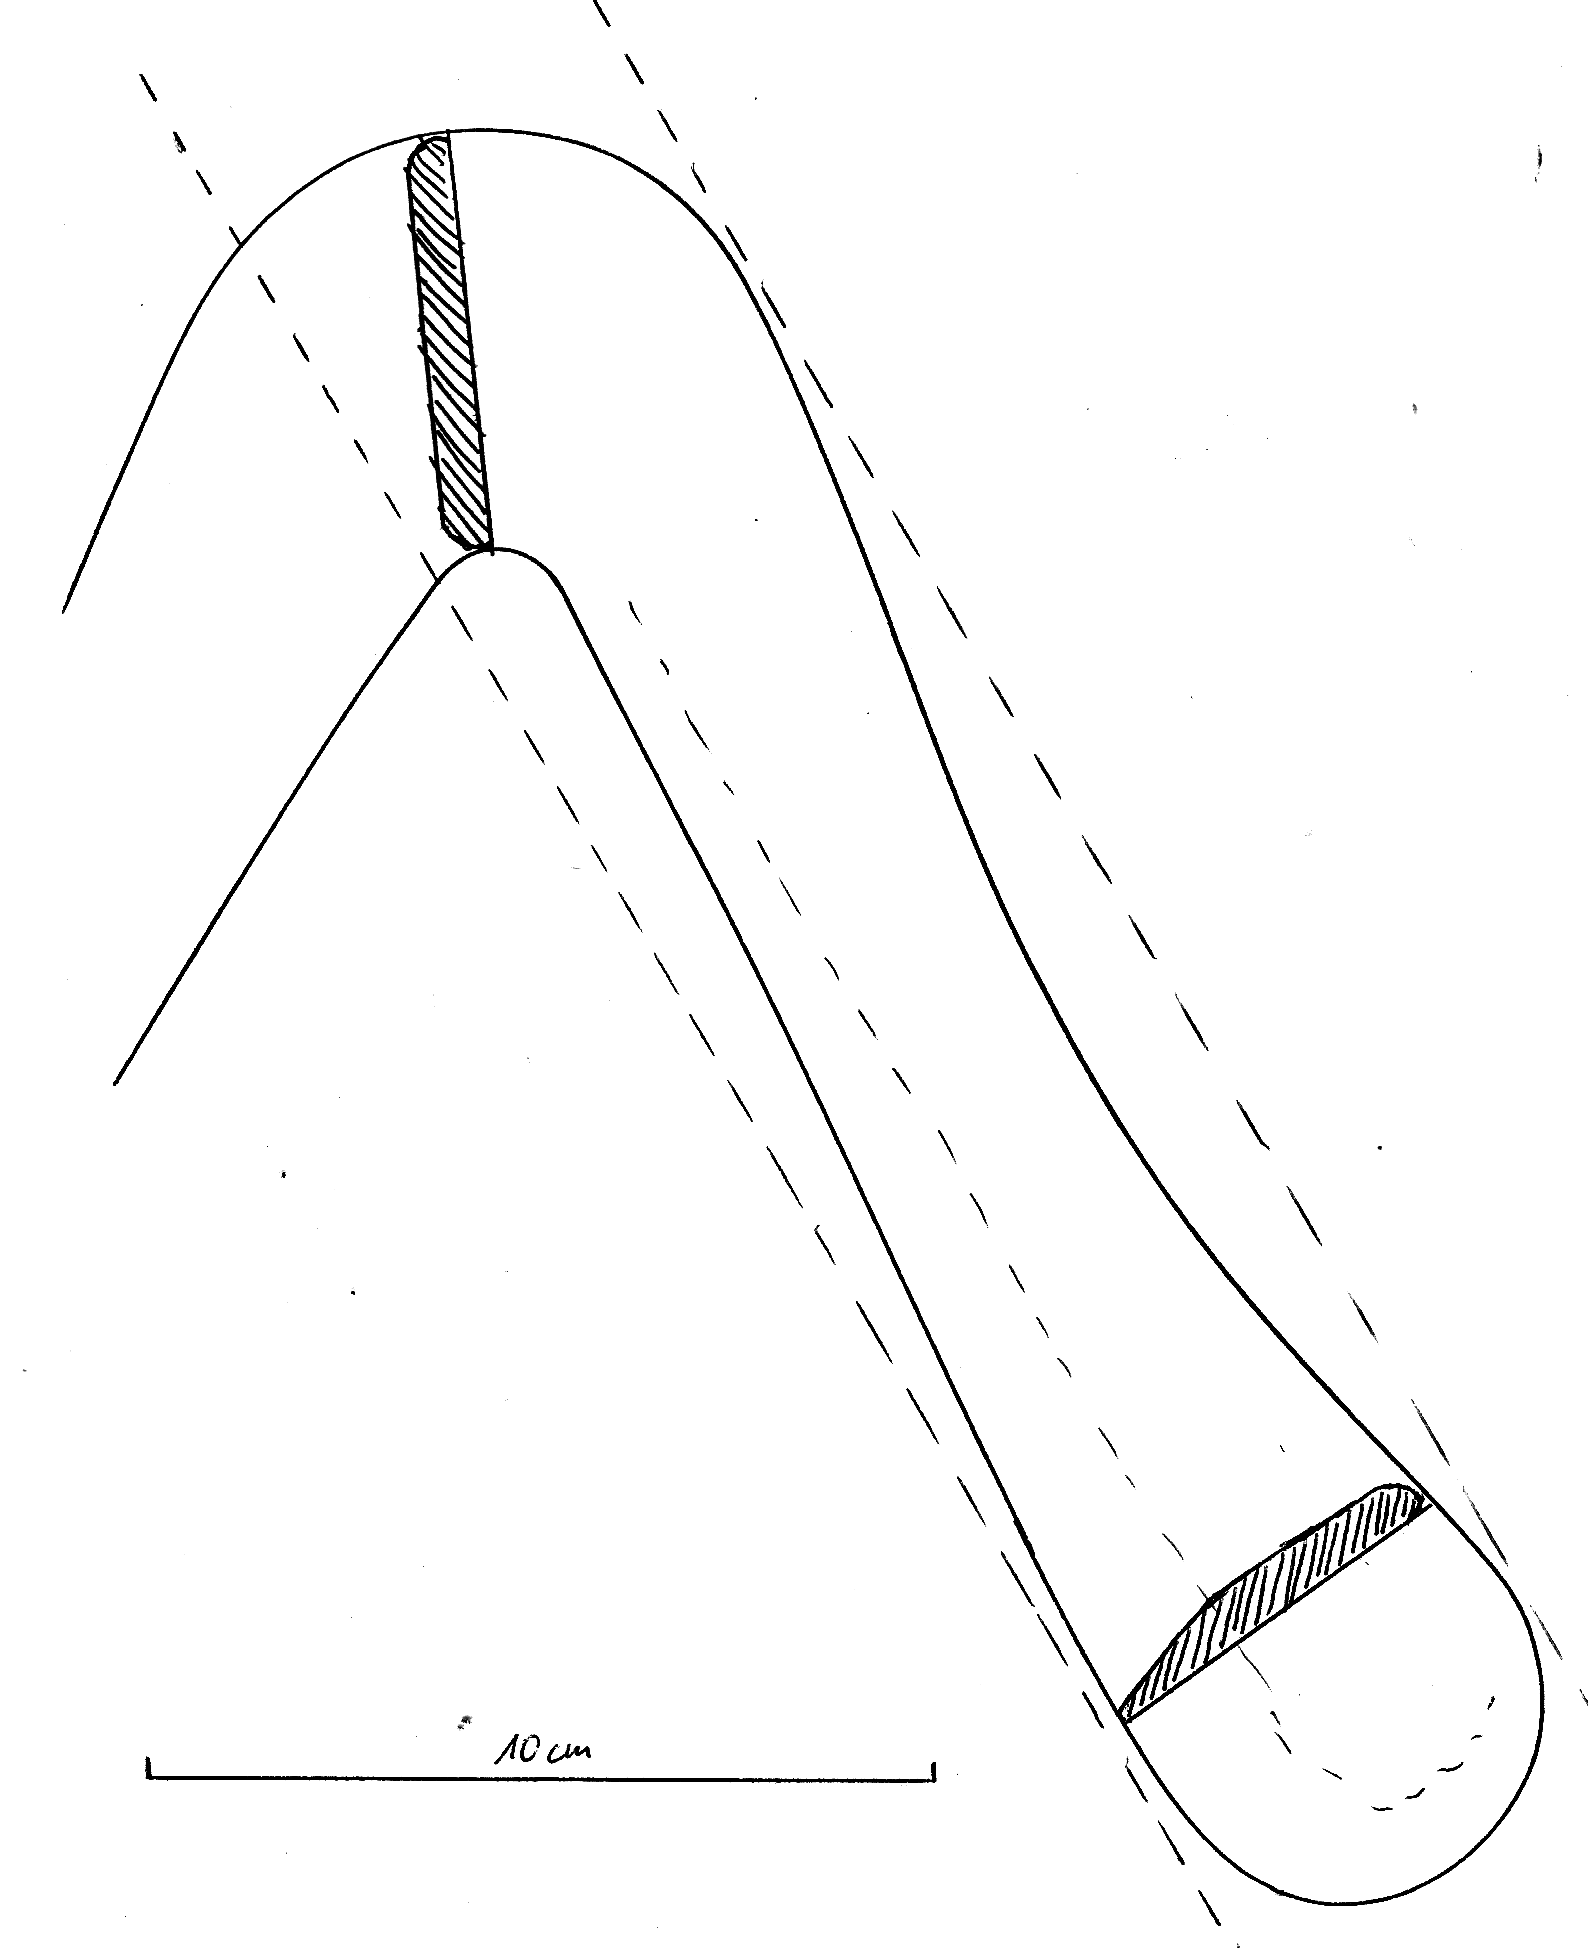
Here is a pattern for the kind of shape I use for lap joints. The dashed lines indicate the blanks. If you want to use this shape, print both halves such that the 10 cm line is of the right length and then stitch the halves together.
Lap Joints and Wood Movement
Whenever you make something out of solid wood, it will move.
Drying wood will typically shrink, mostly along its growth rings, a little less across the growth rings, and very little along its length.
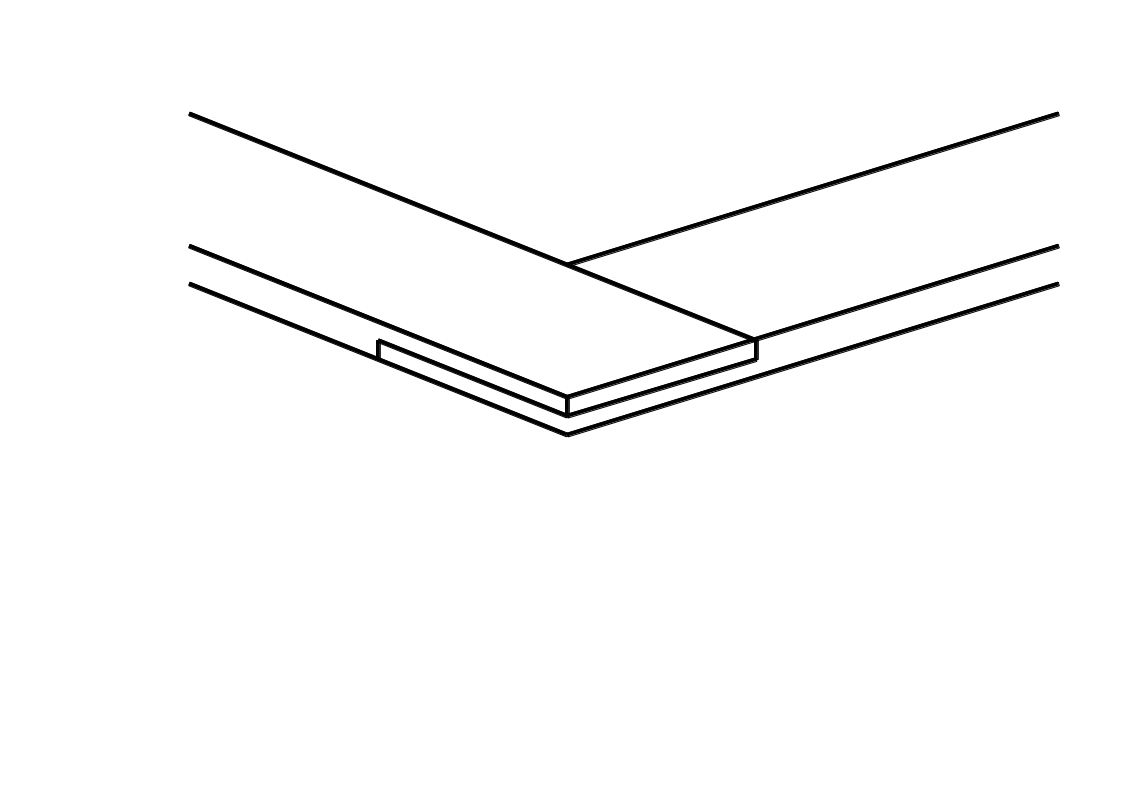
After a couple of dozens of lap joints, I have found that most of the elbows move in a particular fashion that one can plan for. This holds mostly for wood that is close to quartersawn; if you have freaky grain or flatsawn wood, your boomerang might move very differently.
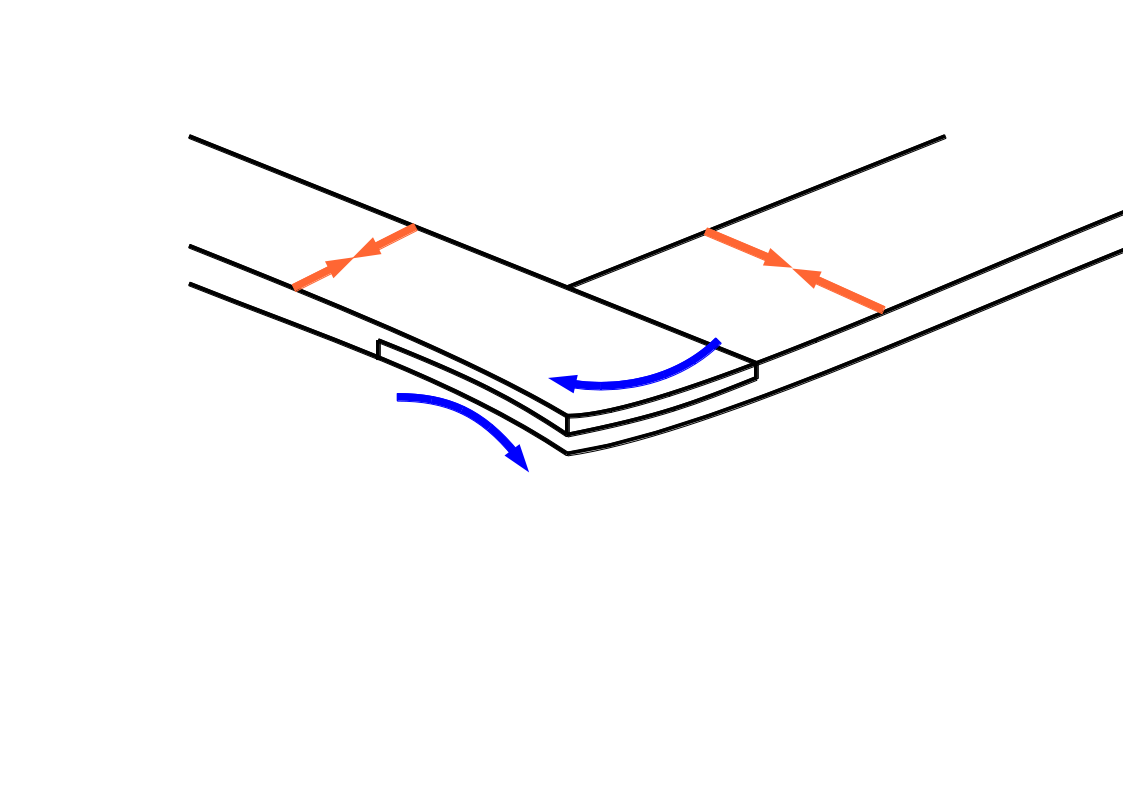
The top picture shows the elbow of a right-handed boomerang in its original state, viewed from the top. When the wood starts shrinking, it will do so mostly across its width (orange arrows in the bottom picture). As there will be very little shrinking along its length, the cross-grain glue joint in the elbow means that the elbow will curl up in the two directions indicated by the blue arrows.
Given that the boomerang is right handed, this means that the angle of attack on both wings will increase, giving a little more lift. Usually, this just means the boomerang flies a little shorter, which is acceptable.
This is why I usually orient the joint in my boomerangs this way (the lead arm on top of the dingle). If you did it the other way around, it might yield a negative angle of attack that reduces lift, a condition that in my opinion is less tolerable than the opposite.
Of course, this is just a heuristic. At the end of the day, each piece of wood will move whichever way it wants to.